Wednesday, December 31, 2014

A Review of the Steps to Successful Composting

The hot composting method (also known as fast or active composting) is the most common as it yields desired results relatively quickly.  It is also the best method to take care of unwanted weeds as it will destroy the seeds during the heat phase.

After you have picked a level site for your composting bin, you will need a good base for the bottom made of leaves and high-quality soil.  The leaves should be chopped or chipped so that no one piece is larger than two-three inches (this is a good rule of thumb for all materials added to the bin).

English: Materials in a compost bin.
Materials in a compost bin. (Photo credit: Wikipedia)
Once your bin and base are in place you can start to add your green food (nitrogen-rich) and your brown food (carbon-rich).  The ratio that should be roughly followed is one part green for every two parts brown.

Monitor the pile every other day for moisture control and temperature.  During this time you need to rotate or turn the pile to get good air flow inside the pile and to help with odors. 

Once your pile is full or has finished the heat phase, let it cure.  The length of curing will depend on your intended use of the finished product.  To eliminate any larger pieces of organic matter that did not break down use a screen to sift them out.  But if you follow the rule of not putting in anything that is larger than three inches this should not happen too often.

A compost humus can be ready to use in as little as 4-6 weeks in a warm climate with a hot composting method and maintenance to the pile on a regular schedule.  If you are going to use the cold (or inactive) method of composting, it can take up to one year for usable compost to be ready.

Hopefully you've gained some useful tips to help you get started with composting! Be sure to stay tuned to this blog for more helpful compost and gardening tips in 2015!


Wednesday, December 24, 2014

Ongoing Care for Your Compost Pile

Unless you are using a cold composting method, your compost pile is going to need regular care and maintenance.  You need to monitor it for any foul odors, heat generation, and moisture levels.  You will need to rotate or turn the material on a regular basis.  You should know when to stop adding materials and let the process finish.  And the final step is to use a screen to separate any larger materials that did not fully break down.

English: Turning a hot compost pile
Turning a large hot compost pile (Photo credit: Wikipedia)
If there is a bad smell coming from your compost pile turn the pile over more frequently to increase air circulation.  You should also add more brown food (leaves, straw/hay, or small twigs) and make sure the top layer of your pile is only brown food.

You will learn the trick of adding water to your pile to make it moist without making to wet with some trial and error.  Inevitably you will make the pile too wet at one point during the process.  If you do, try rotating the material to soak up any extra water and if that doesn’t work, add more brown food.

You can purchase a thermometer that is made especially for composting.  You want the pile to retain a certain temperature to work properly (105-140 degrees Fahrenheit) but if it exceeds 155 degrees, it is too hot.

Routine turning of your pile is necessary to add oxygen, cut-down on odors and to aid in the breaking-down process.  You should turn your pile every other day or at a minimum two times per week.

After the heat phase, the compost pile needs some time to cure and finish the decomposing process.  You can add red earthworms at this point to aid in the curing the humus.

Before you use your finished product, you should put the compost through a screen to catch any larger items that did not compost properly or enough. You can add those to your next compost pile to add beneficial organisms and help start the composting process.


Wednesday, December 17, 2014

What Not To Compost

There are many things you can use to make a good compost humus (which is what the final product is called).  There are also quite a few items that should never go into your compost bin.  Listed below are just some of the materials you should not try to compost, and why it is not a good idea.

Ashes from charcoal should not be added to your compost, although you can add very small amounts of ashes from a fire that was made with untreated wood.  It is not a good idea to add a lot though because it can change the composition and make it too alkaline.

a cat and a Litter box
Don't add cat litter to your compost! (Photo credit: Wikipedia)
Do not add any kind of droppings from an animal that is not a vegetarian.  Animals that pass the compost inspection include horses, cows, rabbits, and goats.  You can even add droppings from hamster or other indoor pets.  But stay away from bird, dog, and cat droppings (including cat litter).  They all can contain harmful organisms - plus they will make your compost smell bad.

Any type of animal waste such as leftover meat, oil, bones, or fish waste are off-limits. They all can cause your pile to smell badly and can attract unwanted pests.

Milk, yogurt, cheese, or any other milk product should be added with caution.  They all will attract animals and pests.  If you do decide to add them, do so in small amounts and cover them with plenty of brown materials afterwards.

You can add weeds, but you should take care to ensure your composting is functioning properly.  If your compost is not generating enough heat the roots may not be destroyed and the weeds may grow again once you spread your compost.  You can dry your weeds on a sidewalk or on some concrete in the sun before adding to the pile as an added precaution to make sure they do not survive.

These are just a few items you should not compost - or should use caution when composting. Following these tips will minimize composting problems, and help make sure your composting efforts are a success!

Wednesday, December 10, 2014

Composting Precautions To Consider

There are living creatures that you want in your compost bin such as microbes and red earthworms, and then there are the creatures you want to stay away like raccoons, rodents, and bears.  A compost bin can be very appealing to an animal who smells easy access to food.  As a rule, you should never put animal products into compost (left over meat and bones, or dairy). Not only do they not make for good composting they will be a magnet to wild animals.  Following are a few more tips to help keep your compost bin free from pests of all sizes.

Compost Bin
Compost Bin with Lid (Photo credit: Wikipedia)
An odor-free compost bin is less likely to attract bears or any other unwanted animal pests.  You can achieve this by rotating or turning the compost pile at least once per week, and making sure you have a good mixture of green and brown materials.  Another precaution that should be taken is to have a bin with a cover, whether it is commercially made or one you make yourself.

Another thing you can do is to put brown food such as leaves or lawn clippings on top of the green food (food scraps and other kitchen waste).  You can also purchase lime at your local nursery or hardware store to sprinkle on the top of your composting materials to increase the rate at which everything decomposes.

The location of your compost heap should not be near the edge of your property - especially if you live near a forest or park area.  This makes it very easy for animals to help themselves without being exposed by walking through your backyard.

If bears or raccoons are a big concern in your community you may want to look into a neighborhood compost pile.  In addition to making composting more accessible to a larger group of people, you can invest in an electric or barbed wire fence to ensure no unwanted animals come looking for a free lunch.

Wednesday, December 3, 2014

Materials You Need to Start Composting

Now that you have decided that you want to compost, there are a few items that you will need to get started.  Most of these items are available in your own yard and require a small amount of planning ahead of time.

After you pick a location for your compost bin or pile (ensure it is in an easily accessible location) you may want to start with approximately four inches of leaves as a base.  If you are able to chip the leaves prior it will make things progress and breakdown faster but it is not a requirement.  The quantity of leaves you will need to make a four-inch deep base will vary depending on the size of the bin you have chosen.

Yard waste composting bin
Yard waste composting bin (Photo credit: Wikipedia)
Your next layer should be about one inch of high-quality soil.  If you cannot find this in your own garden a small bag of organic soil purchased from your local nursery will work fine. 

Then start layering the food for the microbes to eat.  There are two categories of food you are going to need brown (yard waste or dry items such as straw) and green (food scraps, grass clippings, and other organic waste).  A common ratio is two parts brown for every part of green, but it doesn't have to be terribly exact.

You are going to need a spade or heavy-duty pitch fork to turn or rotate the compost at least once per week.  If there is a dry spell you will need a means of adding water (a hose) to keep the pile moist.

With such simple materials and start-up instructions, anyone can start their own compost pile in under a day.  If you choose to not use a bin, consider buying some wire mesh to contain the pile, it can be wrapped around the base of the pile in a circular shape. You may also create a square or rectangular bin by stacking logs or pieces of wood or bamboo to create the sides - or build a bin from wood planks if you want something more durable and enclosed.

Your compost can be ready to use anywhere from four months up to one year, depending on the climate and weather conditions.

Wednesday, November 26, 2014

The Best Place for your Composting Bin

When choosing a location for your compost, the most common location for a compost pile or bin is in close proximity to your kitchen and/or garden.  You want it in a convenient location to make it easy and second nature to bring your food scraps or garden waste to the composter.  And if you have a large yard, the yard waste can get quite heavy and you don’t want transporting the heavy material to be a deterrent to composting.

Turning a compost pile for viticulture
(Photo credit: Wikipedia)
There are other considerations that need to be taken into account when choosing a composting site.  Keeping all the below suggestions in mind, you also want to make sure that it is in an area that children or animals will not disturb or get into the compost bin.

The ground should be level and not prone to collecting excessive water (it needs good drainage).  Your compost pile needs to stay moist but you do not want too much water or it will not work properly.  In addition to level ground, make sure you can easily access the area with a wheelbarrow to transport your finished compost.

A shady location is best, as if the compost pile gets too much sunlight it will get too hot and dry out.  Again, the pile needs to stay moist and overheating it with external sources will not help.

A water source should be close by – you can reach the area with your garden hose or easily carry enough water to moisten the pile if it becomes too dry.  Remember you just want to moisten the pile with a spray of water not drench it.

If you are beginning with a one bin system, you may want to leave enough room for a second bin down the road.  By having two bins side-by-side, you can easily rotate or turn the pile by moving material from one bin to the next.

Wednesday, November 19, 2014

Who Can Benefit From Composting?

As there are many uses for compost, you will find people with different interests and occupations utilizing this environmentally friendly resource.

A homeowner can create a compost bin or pile to reduce the amount of trash they are throwing away.  As an added benefit they are creating a fertilizer for their house plants or garden plot.  Since compost bins require green food (kitchen scraps, grass clippings) and brown food (leaves, straw, shredded brown paper, etc.) you can collect your grass clippings and add them to your bin too.

Garden Compost bin made of Bamboo canes.
Home-made compost pile. (Photo credit: Wikipedia)
On a farm, crops can produce a lot of waste.  A farmer can use crops that are not consumable (ground cover, etc.) and add them to a compost bin along with manure from any livestock they may keep.  Once the compost matures and is ready, the farmer can use the material for added nutrients in the soil, to build up low spots in his field, and to keep the soil healthy. You can even use mature compost as mulch to help the soil retain water and prevent weeds.

A professional landscaper can create compost material for clients that want only natural or organic materials used on their lawn or flower beds.  This can be a low-cost material for a landscaper to utilize providing his clients with Earth-friendly options with a low overhead cost.

If you like the idea of composting but do not have the space or time to create a compost pile of your own, check with your city or municipality’s recycling center.  Some will accept your yard waste and clippings for a city compost heap.  This material will then be used throughout the city’s parks and gardens.  In certain centers they may let the residents utilize the mature compost for their own needs too.

Schools may also utilize compost to teach the students the process of decomposition and to teach children what we can do to help our planet.  This is in addition to the cost savings for the school in up keeping the grounds and gardens. Some schools also plant community gardens as a learning tool for the students, and also to create green spaces and support the local community.


Wednesday, November 12, 2014

What Is Composting?

Composting is a topic that many new gardeners have questions about, and often may shy away from as they are worried about smells or other common misconceptions about compost. But composting is actually an easy way to make your gardening efforts more sustainable, so this month we're starting a short series on composting. This week we're starting off with a basic introduction to composting - what it is, and how it works.

English: A picture of compost soil
(Photo credit: Wikipedia)
In basic terms, composting is recycling your kitchen waste and lawn trimmings and turning them into a valuable resource for your garden or houseplants.  This is done by speeding up the process that the materials you use to compost would naturally go through on their own – decomposition.

Compost is not soil.  It is a common misconception that the end-result of composting is the dirt that you find in the ground.  It is actually a richer substance that acts as a fertilizer (enriching the soil) to grow hardier and healthier plants.

Before you begin composting there are choices to be made – what type of container and style suits your project, what you will be putting into your compost bin, and the location of your bin.  But regardless of these decisions, how you convert your waste into compost happens the same way.  It is a breakdown of waste materials as they are digested by microbes (bacteria and fungi).

The microbes are the workers of the composting equation.  They need air, water, and food to do their job and it is up to you to supply it to them in the right amounts.  If you have heard that having a compost bin or pile creates a foul odor it is most likely the result of not enough air circulating throughout the waste material.  Without air, the material will still break down but it will be done by anaerobic microbes (organisms that do not need oxygen) as opposed to aerobic (ones that need oxygen).  So if you do have an unpleasant smell coming from your compost bin or pile, you can rotate the material to let in more air, or add a substance to create more room for the air to circulate.  Wood chips or hay and straw are good for this.

Composting is good for both the environment and for your garden – it eliminates the amount of waste you throw away and enriches the soil your plants grow in.

Be sure to check back next week when we'll cover the next topic in our composting series!

Wednesday, November 5, 2014

Winter Veggies for the Cold Weather Gardener

What kind of images do the word winter conjure up in your mind? Of course there's Christmas and the holidays, filled with snow and good cheer, as well as the leaves falling from the trees leaving bare branches all around, but did you know that the winter can also be a season of bounty? You always hear about planting your gardens in the spring and harvesting in the fall but you shouldn't count winter out just yet! There are plenty of great and hardy vegetables that can grow all through winter, meaning your garden will be productive all year round! Here are several vegetables that can grow throughout the winter - depending on your climate.

English: A close up shot of Anubi looseleaf le...
Looseleaf lettuce. (Photo credit: Wikipedia)
Winter Lettuce – The name really says it all. There are several varieties of hardy lettuces that are great for growing and picking right through the winter. Depending on how harsh or mild the season ends up being you can decide whether to leave them unprotected or cover them, but in any case you'll never be wanting for a crisp, tasty addition to your meals or salads.

Broccoli – Broccoli is perfect for growing in cold climates or through the winter months. In fact it can even be harder to grow in more tropical climates than it is elsewhere. You can plant and transplant certain varieties of broccoli in the late summer, leaving them primed and ready for picking all throughout autumn and well into the winter months. Eat it solo or on a veggie platter for best effect! 

Asparagus – Perfect for planting in the fall, asparagus takes a bit of work to prepare for and maintain but believe me the work and wait is worth it! Unlike weaker, more frail vegetables, asparagus will keep on trucking right through winter and even the other three seasons for that matter. The asparagus is a champion among vegetables and it will grow underground in the winter, and pop up fresh and tasty spears in the early spring so you can enjoy it freshly cut from your own garden. 

Leeks – Not always on the top of every vegetable gardener's list, leeks are a tasty addition to any winter gardener's menu. They have a wide variety of ways that they can be enjoyed, making them a great choice if you're looking to put something a little different on your plate. Plant leeks and you'll have a vegetable you can pull and enjoy roasted or in soups and stews throughout the winter. 

Kale
Kale (Photo credit: Wikipedia)
Kale - Kale and other cool-weather greens like mustard and turnip greens may grow well throughout the winter, although you may need to cover them on very cold nights. Cold weather actually makes these greens sweeter, and they are not plagued by pests as they can be during warmer parts of the year.

Kohlrabi – Last but not least is the tasty and rambunctious kohlrabi. Many winter and cold weather vegetables grow will often slowly but kohlrabi kicks that idea to the curb, flourishing in colder temperatures. They grow quickly and taste great, often compared to broccoli or turnips. If you want to try something a little different, kohlrabi is sure to be a perfect addition to round out your winter garden! 

Don't be left out in the cold - make sure your garden is stocked with plenty of these delicious wintery vegetables that you can enjoy all through the cold months while other gardeners are resting on their laurels dreaming of a warm spring!

Wednesday, October 29, 2014

Grow More by Setting Vegetable Gardening Goals

Have you ever stopped to think about your vegetable gardening goals? If you are like many gardeners, you may find your main motivation is simply to get outside and reconnect with nature by digging in the dirt. You may also enjoy gardening as a way to squeeze more physical activity into an otherwise hectic schedule. Without question, growing a vegetable garden is a very relaxing way to accomplish these goals.

A sense of personal satisfaction and better overall health are admirable and worthwhile objectives on their own. However, if you dig a little deeper you may find you have a number of other goals for your vegetable garden. If you find you are short on gardening space, clearly defining these goals before you begin growing will make it a lot easier to achieve them.

For example, if you want to reduce your monthly grocery bill throughout the year by preserving part of your harvest, you’ll need to figure out how much you can actually grow in the space you have available. Even if you just want to grow enough so your family can enjoy fresh produce during the warmer months, you’ll still need to figure out what you want to grow and how to make it work within your personal space and time constraints.

Take Stock of Your Personal Resources 

Peter Cundall's vegetable patch, from the ABC ...
Time and space may prevent you having a garden this big. (Photo credit: Wikipedia)
In most cases, the amount your garden can produce will be defined by the amount of resources you can devote to it. Therefore, you’ll want to ask yourself the following questions:

1. How much time do you have to work in your garden?
2. How much space do you have available to plant?
3. If you plan to preserve part of your harvest, where will you store it?
4. What is your budget?

This last question is often overlooked, but it is very important because financial considerations will determine how much you can invest in seeds, transplants or other supplies. Honest answers to all of these questions will ensure you don’t get in over your head or become discouraged before you’ve had a chance to see results. Defining the amount of resources you have available upfront will allow you to set more achievable vegetable gardening goals.

Plus, it’s always easier to overcome a challenge once you clearly define it. Taking stock of your current situation can help you find creative solutions to potential challenges. For example, perhaps you can overcome a small budget by swapping seeds with neighboring gardeners or online communities. If you are short on growing space, maybe you can take advantage of unused vertical space along a sunny wall.

Define the End Results You’d Like to Achieve

Once you’ve developed a clear picture of what you have to work with, you can set realistic gardening goals. Make a list of the fruits, vegetables and herbs you use most in your cooking and highlight your most important “must-have” items. This will help you focus your resources on what matters most to you and will make it much easier if you decide to scale back your plans later.

As you can see, there are many benefits to setting vegetable gardening goals. Once you have a clear picture of what you’d like to get out of your vegetable garden, you’ll have a better idea of what you need, and what you can reasonably accomplish.


Wednesday, October 22, 2014

3 Easy Ways to Extend Your Vegetable Growing Season

If you live in an area with distinct seasons, there are natural limitations to when you can grow vegetables outdoors. In the spring, you have to wait until the threat of frost has passed and soil temperatures reach acceptable levels. Then, before you know it, shorter days and cooler temps will return to signal the end of your outdoor growing season. Unfortunately, we've already reached this season here in Ohio.... :-( 

Of course, it’s difficult to fight Mother Nature - especially if you hope to win. However, if you learn to work within the boundaries she sets, you can find successful ways to extend your vegetable growing season.

Here are Three Easy Ways to Extend Your Vegetable Growing Season

While you can’t prevent late spring frosts or early blasts of winter, you can mitigate much of the damage caused by these natural events. You simply have to be prepared to provide adequate protection for your tender plants when the need arises.

1. Mulch. Adding a heavy layer of mulch is the easiest way to provide protection for your plants. Mulching around your plants provides a layer of insulation for the soil when temperatures dip too low. It will also help hold in moisture as temperatures rise so you won’t have to water as much.

There are many types of mulch available, including shredded leaves, wood chips, grass clippings, straw and compost. Whatever type of mulch you choose for your food growing area, check to ensure it is free of chemical pesticides and herbicides. For example, if you use a lawn service or chemical treatments to keep your lawn green and free of weeds, you wouldn’t want to use your lawn clippings on your vegetable garden.

A picture of my coldframe
A simple coldframe (Photo credit: Wikipedia)
2. Cold Frames. Cold frames are another great way to extend your vegetable-growing season. A cold frame is simply a four-sided structure with a glass or plastic lid on top. They are used to trap in heat from the sun to keep plants warm when temperatures drop.

Cold frames are relatively easy to build. Start by creating a rectangular or square structure out of wood and securing an old glass window or door on top with hinges on one side. This will keep the top from blowing off in the wind and will make it easy to open and shut as you add and remove plants. Potted plants and seedlings can then be placed inside to harden them off or help them survive unexpected dips in temperature. (Just be sure to vent it or lift the lid if the temperature rises outside, so you don't cook your plants!)

In a pinch, you can create a makeshift cold frame with several bales of straw and an old glass window or door panel. Simply arrange the bales in a rectangle, while leaving the interior empty to house your plants. Top with a window or glass-paneled door and securely weigh it down on both ends so it doesn’t fly off in high winds. 

If neither of these options appeal to you, you can always buy a ready-made version at your local garden center or online. You’ll pay more for this option, but won’t have to go through the hassle of finding materials or investing the time to build it yourself.

3. Build a Greenhouse. For many gardeners, a greenhouse is the ultimate gardening dream. How great would it be to have a permanent year-round space to nurture and grow your favorite plants? As an added bonus, a well-designed greenhouse can serve as a beautiful focal point for your property, as well.

Unfortunately, hiring a contractor or purchasing a high-end kit to build a permanent greenhouse can get pretty expensive. Plus, you need to pay to heat the structure part of the year in colder climates. If you rent or have limited outdoor space, a permanent greenhouse may not be a viable option.

However, you can still enjoy many of the benefits a greenhouse offers without the high price tag or long-term commitment. There are a number of very affordable and portable mini-greenhouses available that are lightweight and have a small footprint. These options take advantage of vertical space by providing four or five substantial shelves to house your plants.

With a little planning, these three methods can extend your vegetable growing season. Once you get started, you may be surprised by how much more productive your gardening efforts become!


Wednesday, October 15, 2014

What To Do With Your Fruit After The Harvest?

So you've put in the time and effort, and you're finally ready to sit down and reap the rewards of your fruit garden but... what exactly are you supposed to do with this bountiful harvest? Well, the simple answer is to chow down and eat it fresh, but there are other options too! There are a ton of different things you can do with your fruit once you've harvested it, and most of them don't take very long or require too much effort to enjoy. Here's just a look at some of the things you can do with your freshly picked fruit, other than eat it right away that is.

English: Strawberry jam on a plate. Português:...
Fresh strawberry jam. (Photo credit: Wikipedia)
Jellies, jams, and preserves – If you've ever shopped for fruit preserves you've probably seen the outrageous prices on processed, store bought jams and jellies full of nasty preservatives and artificial additives that are most decidedly not good for you. Instead, with just a little research and a few supplies you can turn your fresh fruits into jams, jellies, and preserves that you can enjoy right away - or later on down the road! Just be sure to properly label and date your jars (or whichever storage container you choose) so you know what you're coming back to later.

A more immediate solution to your delicious fruit usage needs is to turn them into something you can eat and enjoy right away! Fruit is a core part of many different recipes and the fresher the fruit the better. Take the time to get recipes for your favorite pies or cobblers and get baking! Got extra apples? Turn them into tasty fresh cider or a delicious batch of apple sauce. You can even try your hand at natural fermentation and make some hard cider. The only limits you'll run into are your imagination and your appetite.

Last and definitely not least, you can give your fresh fruit to your friends and family. Fruit makes great gifts! Pick and choose from your harvest and personalize each gift basket with its recipient's favorite fruity snacks. Or do a mix of all three choices and deliver a set of jams or a fresh baked pie or cobbler to your neighbors. What good is having all these tasty treats if you can't share and enjoy them with those closest to you?

When it comes to the things you can do with tasty, delicious fresh fruit the possibilities are nearly endless but I'm sure you can come up with something. You worked hard all season, now's the time to kick back, relax, and enjoy all the tasty fruits that you've worked for.


Wednesday, October 8, 2014

Top Tips For Fruit Gardening

When it comes to gardening, the basic concepts are easy to grasp. Make sure that you keep your plants well taken care of, keep them watered, make sure they're getting enough light, keep them free of pests, etc. A lot of it is common sense, but it never hurts to have a few extra tips on hand for taking care of your fruit garden. Whether you're a seasoned gardening pro or a greenhorn green thumb beginner, here's a few ideas for your fruit garden that you should keep in mind as you plant, maintain, and harvest the literal fruits of your labor.

Patience is key, especially if you're growing fruit trees; it's not uncommon for fruit trees to take several years before you have success with them. Very much unlike regular seasonal fruit plants, you should prepare for a long term care investment because it will pay off in the long run when you can enjoy the fresh fruit of your choice on a hot summer's day.

Ripe peaches - geograph.org.uk - 882396
Peach tree. (Photo credit: Wikipedia)
On top of not bearing fruit right away, some trees will have “off” years and not bear fruit at all. Keep track of how often these fruitless years occur and plan accordingly.I know you've probably heard enough about waiting for your fruit, but you should also remember not to pick too early. If your fruit seems too firm, leave it on the branch or vine a little longer to ripen up. Not only do ripened fruits taste better and have a fuller flavor, they're also better for you! Ripened fruits have more natural fruit sugars (which results in that mouth watering sweet flavor) and are also rich in antioxidants as well. Waiting to pick helps you feel as good as it tastes! On the flip side, make sure not to wait too long to pick your fruits or they could end up overripe and, eventually, inedible.

Finally, make sure to check your fruits regularly to avoid disease or infestation. The last thing you want after you've worked so hard on your garden is to have someone or something else feasting on the rewards! Be sure to check for common signs of insect or animal damage and be sure to make a note of signs that something may be wrong with your plants, like discoloration of the leaves, or a lack of proper growth. A healthy garden is a happy garden. If your plants get sick, aren't receiving proper nutrients, or are attacked by wildlife or insects then you could end up with nothing to show for all of the effort you put into your fruit garden.

Gardening of any kind is a time consuming effort, but successful fruit growers will tell you it's worth it. You'll know from the first time that you sink your teeth into a fresh, juicy strawberry or crisp apple that it was totally worth the days and weeks you spent making sure that your garden turned out perfect!


Wednesday, October 1, 2014

The 5 Best Fruits for Beginner Gardeners

The delicious taste of fresh fruit on a warm spring or hot summer's day can be one of the best things in the world, but let's face it, not everyone knows how to grow it well. In fact for many of us who don't have a background in farming or gardening, it can seem like a difficult task to grow even the simplest of crops even with a basic or easy to tend garden - let alone tackling tricky fruits. The good news, however, is that there are plenty of fruits out there that are easy to grow, giving even beginner gardeners a great place to start and get used to gardening even if they don't have much or any experience with t to begin with.

Here's a list of the five best fruits to start with as a beginner gardener - or anyone new to growing fruit:
  1. Strawberries – Good on shortcake but even better ripe and sweetly warm from the sunshine fresh from the garden. Strawberries are easy to plant and just as easy to maintain, making them a top choice for gardeners who are just getting started. You don't have to be a pro to grow and enjoy these delicious berries in a garden bed or balcony planter.
  1. Summer berries.
    Summer berries. (Photo credit: Wikipedia)
    Raspberries/Blackberries – A summertime staple, raspberries and blackberries are delicious straight from the vine, baked into a pie, or turned into a jelly or jam with your morning toast. These berries in particular are hardy and easy to grow, but may take some special maintenance or you run the risk of the thorny vines overtaking more than their allotted space. Make sure to pick up a pair or clippers or trimmers and a good pair of gloves and you should be fine.
  1. Tomatoes – Is it a fruit or a vegetable? Science says fruit and gardeners say easy! These delicious, juicy red fruits are great in a salad or stewed into a tasty tomato sauce for Italian cooking. With the wide range of available gardening accessories you can grow tomatoes even if you don't have a lot of space by using hanging planters.
  1. Blueberries - If you want a fruit you can enjoy near the end of summer then blueberries have your back! All you need is some acidic soil to grow them in (it's what they like best and you can get organic acidifying agents at your local home improvement or gardening center) and you've got delicious blueberries for all of your tasty fruit pies and jams!
  1. Goji Berries – You may have heard of them before, as they are often considered a “superfood” with all kinds of natural, healthy properties. Goji berries are incredibly hardy, growing even in harsher hot or cold climates, which makes them easy to grow even if you live a little north or south of ideal growing conditions for other kinds of fruit and even in windy, coastal areas. Just make sure they have a spot they can enjoy the sun in and you're good to grow!
If you find yourself having trouble getting a handle on more difficult fruits, give these a try and you're sure to be enjoying delicious, fresh fruit in no time!

Wednesday, September 24, 2014

Finding The Space To Grow Fruit

How many times have you seen the prices of fresh produce and wished that you could just grow your own fresh fruits instead? It would be nice, but not everyone has the space available to grow a fruit garden in their yard or home... or do they? While any kind of gardening is a space intensive project, not having a huge area you can devote to your garden shouldn't prevent you from growing fruit at all. You just have to think creatively, plan out your space, and make some smart choices and before you know it you'll be biting into some fresh, juicy fruit for dessert!

English: Fruit trees, Saint Magdalena's Garden...
(Photo credit: Wikipedia)
The first thing you need to do when planning out your limited space is to look at exactly how much you can or want to spare for your fruit, along with what kind of fruits you'd like to grow. Thinking logically of course, even a small fruit tree is going to take up a LOT more space than a patch of strawberries so you have to be prepared to work with what you have. When planning space many people often look outwards when in fact thinking upwards can do just as well. Try using poles or cages to give plants something to grow on that won't take up as much space as growing the plant out over more garden space. Hanging planters work well, too!

Speaking of planters, container gardening is a great way to get fruits growing in a smaller space. You can keep your plants exactly where you want them and, with proper care, make sure that they won't grow over or out of control. Planters can be anything as fancy as decorative ones you might find at a home improvement or gardening store, or as simple as a pot, barrel, can, or other space-appropriate container that your fruit plant will grow and thrive in.

Last but not least, don't feel like you have to grow a ton of fruit; you're not growing to stock a store, just your own fridge. Pick out which fruits you're interested in growing and do the math on how much space just those fruits growing will be taking up. If you end up under your limit and want to grow more, then great! If you end up over, simply plan on either scaling back how much you want to plant, or maybe cut back and even grow fruits in cycles, depending on what kind of fruit it is and how permanent the plants are.

The last thing that you should ever feel when you're planning your garden is that you won't be able to just because of limited space. Fruits are delicious, healthy, whole foods, and having them fresh off of the branch or vine is the best way to enjoy them. If you have the time, money, and are willing to put forth the effort to maintain your fruit garden, your space should be no obstacle to the sweet taste of victory!


Wednesday, September 17, 2014

Growing Fruit Trees: Worth The Wait?

Welcome back! We apologize for the lack of a post last week; after moving into our new house, we had some problems getting the internet up and running.... Thankfully we are connected now, and back in action! One of the things we are planning for our new property is to plant some fruit trees. So I figured it would be a good time to explore this topic for the next few weeks. This week, we're starting off by exploring the pros and cons of growing fruit.

Nectarine (Prunus persica) fruit development o...
Nectarine (Prunus persica) fruit development over a 7½ month period, from early winter to midsummer. (Photo credit: Wikipedia)
When you think about growing a garden you generally plan to plant seeds one afternoon, spend a few weeks to months taking care of them, and then finally having something you can cook or eat fresh right off of the vine or or out of the ground right away. Fruit trees on the other hand are a much longer investment of time and effort, but continue to yield results year after year even when other plants will have long since been harvested and replanted. If you're thinking about planting fruit trees, then you should make a few key decisions before you start and along the way.

First of all you have to decide if you want to reap the rewards of your work within a short period of time, or if you're actually willing to wait for your work to come to fruition (no pun intended). It can take years for a fruit tree to actually mature enough to start bearing fruit and it can be a long and arduous process of maintenance, pest control, and care that can end up failing and coming to nothing if you aren't prepared, or don't put in the proper time or effort. However, if you're the type of person who doesn't mind settling in for the long haul then you can enjoy delicious fresh fruit year after year once your tree has matured.

Something else that you should think about as you're deciding whether or not to plant fruit trees is what kinds of fruit you might want to grow. There are many factors that come into play when you decide to plant fruit trees such as the condition of your planting area (such as the yard space you have to work with and the quality of the soil) as well as the climate and seasonal harshness of the area you live in. Some places are great for growing fruit trees and will have no problems seeing your trees thrive and flourish, but if the area you live in is subject to harsh seasonal swings you may be limited in the types of fruit you can successfully grow.

English: Pieces of fruit in a basket Nederland...
(Photo credit: Wikipedia)
One unique perk that fruit trees offer (one that you might not initially realize) is the value that it adds to your home and property. Even if you never plan on selling your home, think of what your fruit trees will offer to you, your family, your friends, and your neighbors. You don't just get the bonus of having a tasty treat you can pluck straight from the branches in your yard, you also have a healthy snack you send to school with your children, ingredients you can use in cooking for family get-togethers, fruit you can preserve for the winter in various ways or to give as gifts, or simply fresh fruit you can gather into a gift basket. The benefit of having fruit readily available is practically endless.

In the end what it all comes down to is whether or not you're willing to persevere through the hard work and long wait of your fruit tree maturing to the point it can actually bear fruit. Even if you start with a partially grown tree that you transplant you will still have to put in the effort of nurturing and acclimating it to its new home while also guarding its safety from insects and disease. If this is something that you think that you can do then planting a fruit tree is definitely worth the wait when you can finally sink your teeth into a crisp apple, juicy pear, or whichever delicious fruit you've decided to grow.

Be sure to stay tuned next week, when we'll discuss the first steps you'll need to think about when planting your fruit trees.

Wednesday, September 3, 2014

Utilizing Vertical Gardening to Save Space & Grow Healthier Veggies

Many would-be gardeners never get started because they think they don’t have enough space for it. If you fall into this category, you may be pleasantly surprised to learn how much you can actually grow in a very small area!

All it takes is a little creative thinking.

Unfortunately, many gardeners focus only on the area under their feet. Given that most plants are grown in soil, this line of thinking makes sense. However, you can break free from this limited line of thinking once you decide to “look up.”

Did you realize that for every square foot of ground space in your garden, you actually have another 6 feet of valuable gardening space above it? It’s true! If you take advantage of all that untapped vertical space, you can grow so much more than you ever thought possible.

Save Space with Vertical Gardening

English: Vine climbing fixed steel ladder. 日本語...
Use an old ladder as a trellis. (Photo credit: Wikipedia)
Plants trained to grow up take up a lot less ground space than those that are left to their own devices. In fact, a single climbing vine only needs a couple square inches of dirt to thrive. If that same vine is not offered vertical support, however, it would quickly cover several feet of your valuable – and limited - growing area.

There are many ways you can provide vertical support for your plants. Some of the most common examples include trellises, tepees, arbors, hanging baskets, stacked containers, and fences. You can also take advantage of unused wall space along your house or garden shed by adding wood shelves, hanging planting pockets or repurposing old gutters into plant containers.

Often you can train your plants up existing structures on your property without needing to build or buy anything new. Split rail and chain link fencing are particularly effective for this purpose. For an inexpensive option that offers a lot of rustic charm, you can wire 3 long wooden poles or bamboo stalks together to form a tripod “tepee” that is ideal for growing pole beans or other vining vegetables. 

If you want to add an artistic focal point to your garden, there is a huge selection of ready-made decorative vertical support structures available. For example, you can find decorative wrought iron trellises embellished with glass crystals or beautiful cedar hanging wall units you can add to an unused stretch of sunny wall space.

Ideal Plants for Vertical Gardening

There are a lot of fruits, vegetables and culinary herbs you can grow in your newfound vertical gardening space. In addition to pole beans, you can also grow other vining vegetables such as cucumbers, melons, pumpkins, squash and gourds. Smaller, more compact plants like herbs and edible flowers do well in smaller spaces like hanging baskets or wall-mounted units. By “suckering” or removing side stems from tomato plants, you can train them to grow in a more upright fashion. In addition to saving space, this process can also help your tomato plants stay healthy and become more productive.

My cucumbers climbing a rope trellis.
Grow Healthier Plants with Vertical Gardening

In fact, many gardeners find that vertical gardening leads to healthier plants in general. There are a number of reasons for this. For starters, plants grown vertically have a lot less direct contact with soil, which translates to fewer problems caused by soil-dwelling pests and diseases. If garden pests do attack your plants, the problem will be easier to see and treat if the plant is elevated off the ground.

In addition, vertically grown plants have better exposure to light and air than those allowed to grow freely along the ground. This, in turn, leads to better ventilation and food absorption. The end result is a healthier plant that is more resistant to disease and better able to produce at peak capacity.

For some more really cool ideas on vertical and small-space organic gardening, be sure to check out this resource too!

http://a89259xjql42rvb-kguz2agj49.hop.clickbank.net/?tid=BLOG

Wednesday, August 27, 2014

Natural Homemade Solutions To Your Organic Gardening Problems

Gardening organically is a great way to ensure your family and friends eat healthy and treat the earth well, but it does present some challenges.  The biggest challenges are usually in taking care of pests and fighting disease in order to grow a beautiful and bountiful harvest.

In today's post, we'll take a look at some natural, homemade solutions to these organic gardening problems.

Aphids:

English: Pea aphids extracting sap from the st...
Pea aphids extracting sap from the stem and leaves of garden peas. (Photo credit: Wikipedia)
Aphids can be successfully treated with either of the following sprays. The key to either is making sure you are diligent in spraying all the leaves, including the undersides.

Oil and soap spray - Take 2 teaspoons of Mineral oil or Neem oil and add in 2 or 3 minced garlic cloves. Let it steep for about 24 hours, then strain. Next add 1 teaspoon liquid dish soap and 1 pint of water. Use 1-2 tablespoons of this mix with a full spray bottle of water.

Always test it on a leaf first to make sure it does not harm it. If it does, dilute it with more water and try again.

This spray is not picky as to which insects it eliminates so if you do have some beneficial insects around that you don't want to harm, you should try the next spray instead.

Tomato leaf spray - Add 1 cup chopped tomato leaves to two cups water and let sit for 24 hours. Strain and add this mixture to a large spray bottle, filling it up the rest of the way with water. Spray liberally on all affected areas.

Animal Pests:

Use red pepper spray and many critters won't come back for seconds.  It makes the plants just too spicy for rabbits, mice, birds and squirrels. Mix 3 tablespoons of Tabasco sauce and 1 teaspoon dish soap. Add this to 1 quart of water and spray around the area. I have also found that squirrels don't like cinnamon. Sprinkle it liberally on the ground around your plants to keep squirrels from digging there.

Slugs:

 In the spring, go on a nightly slug hunt. Using a flashlight, locate the slugs and sprinkle table salt on them. A couple nights of this should sufficiently decrease your slimy slug problem. You can also pour beer into shallow lids and set on the ground. Many people report that this will attract slugs which will crawl in and drown.

Powdery mildew, a Biotrophic Fungus
Powdery mildew, a Biotrophic Fungus (Photo credit: Wikipedia)
Powdery Mildew:

This is a serious fungal disease that hits many types of plants, including squash and cucumbers in particular, but weekly spraying of 30% skim milk or raw milk to 70% water can take care of it.

Weeds:

Good old vinegar can kill most weeds but it can also kill your plants. Do not pour it on weeds in your grass or you'll end up with dead grass spots. If the weeds are close to other plants, try using a paint brush to brush the vinegar on the weed's leaves. Or just pull them out by the roots.

Not only are homemade organic remedies good options for your garden, they're also inexpensive and use everyday household items. Try any of these options to take care of your organic garden problems and reap the rewards with a great bounty.

Wednesday, August 20, 2014

Compost Smells, & Other Composting Myths

Composting is a natural and simple process and yet it has been complicated by machines, fallacies, misinformation, myths, and misunderstandings. Some of these misinformed facts have been passed around so many times that the general perception has become accepted fact. An example would be the idea that all compost smells bad. But before we go into that, let’s discuss some other composting myths first.

Myth: Composting requires a lot of work

English: Face cut of compost pile showing deco...
Natural decomposition of a compost pile. (Photo credit: Wikipedia)
Truth: Composting is a natural process which involves the elements of nature doing the majority of the job for you. All you need is to gather all the materials, lay it on, and let nature do her job. Composting is a low maintenance activity as well. You only need to turn the compost pile every once in a while to keep the air flowing to quicken the decomposition process and that’s it. (You really don't even have to do this - it just speeds up the process.) You practically sit and wait for the the compost to finish.

Myth: Composting is limited to farms and wide open spaces

Truth: On the contrary, people living in urban areas who have even a very small space can create their own composting bin from a trash can. How much space would that take up? If you don't want to build your own, there are also many small-sized compost tumblers available for purchase at farm stores and over the internet. Also, there is another technique which you can use, called vermicomposting, which involves the use of red worms in a contained bin where you feed them table scraps. You can even do this indoors!

Myth: Composting needs precise measurements

Truth: Even though composting ideally would be best achieved with the right combination of greens and browns elements, having the exact measurements is not that necessary. Estimates work just fine. And those neatly piled up layers of composting piles you see in commercials, books, pamphlets and brochures of composting products - those are all for show. You don’t need to copy those, composting works the same way even if you pile them up haphazardly.

Myth: You need specially formulated chemicals as starters or activators

Truth: Despite the claims of commercially available products that applying them to the compost pile will speed up the process of decomposition, buying them is not really necessary. It is good practice to just throw in some finished compost (if you have it) into the newly formed compost pile and that itself will serve as the activator to get things started. But there’s no need to buy that expensive stuff.

Myth: Adding yeast will boost the compost’s performance

Truth: This is not true at all. What you’re doing is just wasting your money by adding yeast to the compost pile. Yeast does not do anything to the compost pile and neither does it affect the performance or quality of the compost.

English: Materials in a compost bin.
Garden materials in a compost bin. (Photo credit: Wikipedia)
Myth: Animals are attracted to compost piles

Truth: This is true to some degree. Composting piles do attract the occasional cat, dog or raccoon - especially if you have a totally open pile that is not protected or enclosed. Small critters will likely go for open compost piles and for piles that have kitchen scraps like meat, fat, dairy products, bones and pet manure added to them. Therefore, it is usually best to avoid adding these items to the compost pile - especially if you live in an urban area - and these can also cause your compost pile to smell - which brings us to our final myth.

Myth: Compost smells bad

Truth: Compost should not have a bad smell. If you find bad smelling compost, then the maker did a poor job picking the materials for the compost pile. If your compost includes only green and brown items and vegetable matter, is properly exposed to air, and is not kept too wet, it should have only a mild earthy smell.

Hopefully clearing up these myths will help you in your decision to start a compost pile. It will be the best thing you ever did for your garden!


Wednesday, August 13, 2014

Product Review: Good Ideas Rain Wizard

I’m always thankful for the rain when it comes to my garden. It means my plants are happy and watered without me needing to head out and take care of it. Wouldn't it be nice if I could just always use rain instead of adding to my water bill? As a sustainable gardener, in my apartment, I usually try to collect rain in 5-gallon buckets during the summer, but it's not always enough. Now that we're moving into our new house, a rain barrel is a must for my garden planning next summer!

One good option is the Good Ideas Rain Wizard. This, like other rain barrels, is a big plastic barrel that you put outside and it collects water as it rains. There is a spigot on the bottom where you can hook a hose up and water your lawn or your garden without worrying about what it’s doing to the water bill. I always feel bad about wasting water on grass, and it’s also much better for the environment.

As an added bonus, this is a great idea for people who live in places where there are water shortages during certain times of the year. Collect as much of the rain as you can when it comes, and then use it to water your garden during dry periods!

Features of the Good Ideas Rain Wizard
Good Ideas Rain Wizard - Oak.

  • It’s made of BPA free plastic so it’s not going to contaminate your water even if it’s sitting in there for a long time. 
  • The 50 gallon size means you’ll be able to capture a ton of rain water and you don’t need to worry about it running out too fast. 
  • The hole on the top has a grate over it to keep pets and children safe. It also keeps out bugs and debris. It’s easily removable in case you want to set it up so your gutters drain the rain into it. 
  • No flimsy plastic spigot, it’s made of brass so you won’t need to worry about it breaking off when you attach the hose. 
  • Plastic sides are thick and sturdy so there won’t be any breaks or leaks. Direct sunlight won’t dull or ruin the barrel in any way. 
  • It also comes in a bunch of colors and in my opinion it looks quite decent.
 Are There Any Downsides?

There are a few cons to this and other rain catching barrels.

One is that you don’t want to leave them out during the freezing months. Like a hose, you want to empty it and move it into a shed or garage once temperatures get low enough to freeze.

Also, it's only 19 pounds empty but as it fills up don’t expect to be able to easily move it. Fifty gallons of water is HEAVY! 

Conclusion

The Good Ideas Rain Wizard is a great way to save money on your water bill and is great for the environment. Rain water is perfect for watering your plants and lawn sustainably. It’s sturdy and pretty much set and forget as long as you empty it before the first freeze of winter. All-in-all, a rain barrel like this can be a great investment considering how much money you can save on your water bill when you no longer need to pay to water the lawn or your garden.

Wednesday, August 6, 2014

4 Easy-to-Grow Culinary Herbs Ideal for Small Spaces

Fresh herbs are a great way to bring the flavors of your dishes to life. Unfortunately, they can be expensive to buy at the grocery store and they aren’t always in season. Although you can use their dried counterparts in your favorite recipes, they just don’t deliver the same flavor profile.  Fortunately, you can enjoy fresh herb flavor all year long and you don’t need a ton of space to do it.

If full-scale gardening isn’t your thing or if space is at a premium in your garden, you’ll want to get the most bang for your buck from your plant choices. Not only do you want to select herbs that are easy to grow, you’ll also want to select versatile options that pair well with a diverse selection of recipes. The following list of easy-to-grow culinary herbs can help you get started.

Here are 4 Easy-to-Grow and Versatile Herbs

Basil
Basil (Photo credit: Skrewtape)
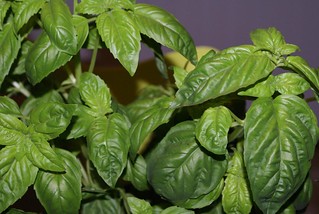
1. Basil. Basil tops the list because it is so versatile and is super easy to grow from seed. All you need is a small pot and sunny windowsill and you can have fresh basil at your fingertips all year long.

After all, what could be better than juicy tomatoes paired with fresh mozzarella and fresh-picked basil?  Top with a balsamic reduction, some good extra virgin olive oil, and a little salt and fresh-cracked pepper and you’ve got a delicious and easy lunch entrée or dinner salad.

Basil is also an important ingredient in fresh pesto recipes and it pairs beautifully with tomato-based pasta sauces. For a unique twist, add julienned basil and Brie cheese to sourdough bread for a fabulous grilled cheese sandwich.  If you want to get even more creative, plant a pot of purple basil to make a beautiful and delicious purple basil jelly.

English: Fresh Cilantro (Coriander) Deutsch: V...
Fresh Cilantro (Coriander). (Photo credit: Wikipedia)
2. Cilantro (Coriander).  This herb does double duty. The fresh leaves (cilantro) of young plants are a staple in Mexican cooking. Fresh cilantro is a key ingredient in homemade salsas and also adds a unique flavor dimension to salad greens. It can also be used in a wide variety of marinades for beef, chicken, pork and vegetables. It is especially well suited for marinating meats for fajita recipes.

Cilantro is also very easy to grow from seed. You can extend the life of your plant by keeping it plucked down and keeping it in cooler areas. In spite of your best efforts, however, it will eventually “bolt” to form lacy flowers that will set seeds that can be harvested. Those seeds can be lightly toasted and ground down to create coriander, which is much more mellow in flavor than its fresh counterpart and is a nice complement to many recipes.

English: Rosemary
Rosemary (Photo credit: Wikipedia)
3. Rosemary. Rosemary can also be started from seeds, but you may find it easier to pick up small plants from your local garden center each spring. They can then be brought indoors during cooler weather, but you will need to keep them moist and provide access to a sunny window, preferably with a southern exposure, * to keep them happy. If cared for properly, they will live for many years.

Not only is rosemary delicious in marinades for roasted chicken, pork, or beef, it also imparts a wonderful earthy aroma to roasted new potatoes and homemade focaccia bread.

Rosemary is also a very pretty plant with decorative appeal. It adds structure to the herb garden with its elegant upright growth habit. Plus, it can easily be shaped to look like a Christmas tree. As a result, rosemary makes a lovely hostess gift around the holidays.

Thyme
Thyme (Photo credit: Erutuon)
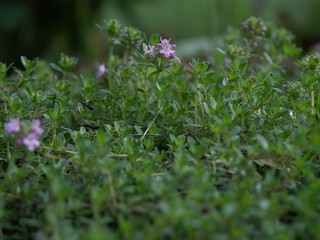
4. Thyme. This is another classic culinary herb that is so easy to grow. Fresh thyme is a staple in many types of cuisine and adds a distinctive flavor to meat-based dishes and is wonderful in stews and soups, as well. For a special treat, grow lemon thyme to add an unexpected hint of citrus flavor to your dishes.

Another thing to love about thyme is its beauty. It has a beautiful growth habit that makes it ideal in pots next to taller herbs like rosemary. Use it outdoors to edge walkways and paths to add a fragrant element to your landscape.

Of course, these four easy-to-grow culinary herbs barely scratch the surface of what you can grow in a limited space. The herbs listed here are easy to grow and can be found in a diverse range of recipes, so not only will you enjoy growing them, you’ll love using them, too.

*Southern exposure in the Northern hemisphere.

Wednesday, July 30, 2014

Succession Planting - Grow More Vegetables in Less Space

If you have a small amount of space to plant a vegetable garden, you are probably eager to get the most out of it. Succession planting is a great way to accomplish this. This practice involves growing the same or complementary crops in the same spot continuously throughout the season in order to maximize the yield a garden can produce. In other words, succession planting combines the efficient use of space and timing to obtain better results. 

Gelbe Rüben und Zwiebeln in Mischkultur; Compa...
Companion planting of carrots and onions (Photo credit: Wikipedia)
Many novice gardeners mistakenly believe that planting and sowing seeds is a one-and-done process that only happens at the beginning of the growing season. So, they head out to the garden each spring, get some plants and seeds in the ground… and wait for the magic to happen.

Unfortunately, following this one-off approach to planting is almost guaranteed to cause many peaks and valleys in what can be harvested throughout the season. If you want your garden to produce an abundant supply of fresh produce all season long, you need to plan ahead for it.

Plan Ahead for Successful Succession Planting 

To create a successful succession-planting plan for your garden, you need to take a number of variables into account. For example, you’ll want to consider how long each crop takes to reach maturity, how long it produces once mature, and which crops can be harmoniously planted in the same space at different times throughout the season.

Although the number of variables involved in succession planting may seem a little intimidating at first, don’t let that discourage you. It may take some practice, but you can definitely get the hang of it. If you are just starting out, choose only one or two beds or containers to practice in your first year. Also, take detailed notes in your garden journal throughout the growing season so you know what worked - and what didn’t - when next season rolls around.

Getting Started with Succession Planting

Before you start digging in the dirt, you’ll want to have a good idea of what you plan to grow. Start by making a list of which plants you want to grow in your succession planting area. As you are compiling this list, make sure you note the correct variety of each plant, because there is a lot of diversity among different varieties of the same plant species.

Then, next to each plant variety on your list, note how long that particular plant takes to reach maturity, is it heat or cold tolerant, how many hours of sunlight it needs each day, what type of soil it prefers, and its spacing requirements. The back of seed packets and garden catalogs are great starting points for this exercise.

Aeroponics-companion-plantings
(Photo credit: Wikipedia)
Once you know what you’d like to grow in your selected space, decide if you want to focus on growing the same crop throughout the season or if you want to try inter-planting more than one variety. Lettuce and herbs like basil and cilantro are great for repeated sowing all season long. However, if you want to try more than one crop, try to find a couple of recommended companion plants for your favorite choices.

If you need more information on companion planting, there are tons of great resources and books available on this topic.  The best ones provide a lot of great information to help in your planning process.  Online resources are nice, but it’s always good to have a hard copy on hand for future reference. (Click the "companion planting" tag below this post for more articles on this topic - and check out the suggestions below for some hard-copy resources.)

Although succession planting may seem complicated at first, you’ll be amazed at how quickly you can make it work for you. By applying the principles of succession planting to your own backyard garden, you’ll soon be growing more fresh fruits, vegetables and herbs throughout the season than you ever thought possible.

Recommended Resources for Succession & Companion Planting: