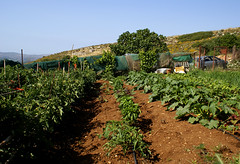
Saturday, April 30, 2011

Spring Vegetable Garden Series - Carrots to Pumpkins

Here is the second part of our vegetable cultivation article. Read on for more about growing crunchy carrots and cucumbers, juicy melons, and more. Mmmm, I'm hungry already!

Carrots:
Carrot diversityImage via Wikipedia Carrots are of two general kinds: those with long roots, and those with short roots. If long-rooted varieties are chosen, then the soil must be worked down to a depth of eighteen inches or so. The shorter ones will do fine in eight inches of well-worked sandy soil. Do not put carrot seed into freshly manured land (see tip about beets, in previous post). Another point in carrot culture concerns the thinning process. As the little seedlings come up, you will doubtless find that they are much, much too close together. Wait a bit, and thin just a few at a time, so that young, tiny carrots may be used on the home table, and you don't have throw away all of your thinnings. The ones that are left behind will get bigger as they are given more space to grow, but you can certainly use the smaller ones that you thin out, if you just let them grow a bit first. 

Cucumbers:
The cucumber is the next vegetable in the line. This is a plant from foreign lands. Some think that the cucumber is really a native of India. A light, sandy and rich soil is needed -- I mean rich in the sense of richness in organic matter. When cucumbers are grown outdoors, as most people are likely to grow them, they are planted in hills. Nowadays, they are also sometimes grown on fences, in hothouses, even hanging baskets, which can be a very pretty sight. (Please note that if grown indoors, cucumbers will need to be pollinated manually, as they usually rely on bees and other insects in the garden to pollinate them in order to set fruit.)

If you intend to raise cucumbers, follow these directions: Sow the seed inside, cover with one inch of rich soil. In a little pot of about six inches diameter, plant six seeds. Place like a bean seed with the germinating end in the soil. Water well, When all danger of frost is over, each set of six little plants, soil and all, should be planted out in the garden. Later, when plants are a little more established, thin out to three plants in a hill. The hills should be about four feet apart on all sides. You may also grow cucumbers on a fence - they may need a little help to start growing upwards, but once you give them a little coaxing, they will take off on their own, and climb everywhere like crazy. This can be a very pretty addition to your garden, and a nice way to cover an old fence or wall.

Lettuce:
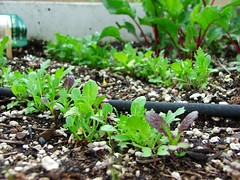
Even before the time of Christ, lettuce was grown and served. Our cultivated lettuce likely came from a variety of wild lettuces. There are a number of cultivated vegetables which have wild ancestors, carrots, turnips and lettuce being the most common among them. Lettuce is great because it may be tucked into the garden almost anywhere. It is surely one of the most decorative of vegetables - Lettuce Cultivars by David Shankbone, New York...Image via Wikipediawith many different colors and textures available for growing. They grow well in a variety of soils, and don't mind cool weather too much, so they are a nice early spring vegetable, and may also be grown in the fall (I actually planted some last fall, which wintered over right underneath the central Ohio snow, and now is beautiful and growing like crazy!)

As the summer advances and as the early sowings of lettuce get old they tend to go to seed. Don't let them. Pull them up. Most of us aren't likely to go into the seed-producing side of lettuce. What we are interested in is the raising of tender lettuce all the season. To have such lettuce in mid and late summer is possible only by frequent plantings of seed. If seed is planted every ten days or two weeks all summer, you can have tender lettuce all season. When lettuce gets old it becomes bitter and tough, so don't let it sit there taking up valuable garden space once it starts going to seed.

Melons:
Melons are most interesting to experiment with. It is believed that melons originally came from Asia, and parts of Africa. Melons are a summer fruit. Over in England we find the muskmelons often grown under glass in hothouses. The vines are trained upward rather than allowed to lie prone. As the melons grow large in the hot, dry atmosphere, just the sort which is right for their growth, they become too heavy for the vine to hold up. So they are held by little bags of netting. The bags are supported on nails or pegs. This is a very pretty and interesting sight. But here we usually raise our melons outdoors. They are planted in hills. Eight seeds are placed two inches apart and an inch deep. The hills should have a four foot sweep on all sides; watermelon hills ought to have an allowance of eight to ten feet.

Make the soil for these hills very rich - they like manure and compost! As the little plants get sizeable -  say about four inches in height - reduce the number of plants to two in a hill. Always choose the very sturdiest plants to keep. Cut the others down close to or a little below the surface of the ground. Pulling up plants is a shocking way to get rid of them. (By this I mean it poses a shock to the others, because the pull is likely to disturb the roots of the two remaining plants.) When the melon plant has reached a length of a foot or so, pinch off the end of it. This makes the vine branch out and grow more fruiting branches, instead of just one long vine, which by itself can't sustain as many melons. Sand or lime sprinkled about the hills is an safe and organic way to help keep bugs away.

Pumpkins:
The word pumpkin for most Americans stands for good, old-fashioned pies, for Thanksgiving at grandmother's house. It really brings more to mind than the word An assortment of winter squashes, such as Turb...Image via Wikipediasquash. I suppose the squash is a bit more useful, when we think of the fine Hubbard, sweet and creamy orange Butternuts, and the nice little crooked-necked summer squashes; but we must remember not to neglect the other cousin - the pumpkin. And as for Jack-o'-lanterns why they positively demand pumpkins. In planting these, the same general directions hold good which were given for melons. And use these same for squash-planting, too. But do not plant the two cousins together, for they have a tendency to run together and cross-pollinate, which means your pumpkins may end up a different color or shape than you would expect for your Halloween carving! Plant the pumpkins in between the hills of corn and let the squashes go in some other part of the garden.

Well, there you have some useful planting tips for the cultivation of vegetables in your spring and summer garden. Obviously this is not an exhaustive list - there are indeed hundreds of varieties of veggies that we didn't even touch upon here, but so much info is out there about planting things like tomatoes and peppers, I wanted to give an overview and instructions for planting a few less-known and discussed vegetables, which would make a great and healthy addition to your garden - and table - this year.

Please feel free to post comments or questions below!
Enhanced by Zemanta

More Vegetable Gardening Resources:
    

Thursday, April 28, 2011

Spring Vegetable Garden Series - Beans Through Cabbage

Today we get into some of the good stuff - individual vegetables, and their care and cultivation. Read on for some good tips, as well as ideas for veggies that you may not have thought to grow before, but which may make a nice addition to your spring garden.

Beans:
List of vegetables in AssamImage via WikipediaThese days, most people choose to grow bush beans rather than pole beans, and I'm not quite sure why, unless it is just a question of convenience. In a city backyard the tall varieties might perhaps be a problem since it would be difficult to get poles. But these running beans can be trained along old fences and with little urging will run up the stalks of the tallest sunflowers. So that settles the pole problem. There can definitely be an ornamental use for pole beans. Try planting them at the extreme rear end of each vegetable row. Make arches with supple tree limbs, binding them over to form the arch. Train the beans over these. When one stands facing the garden, what a beautiful terminus these bean arches make! And the beans themselves will then be easy to pick without a lot of bending over, so pole beans may be a good choice for those with bad backs, knees, or those with low flexibility.

Beans like rich, warm, sandy soil. In order to prepare the soil be sure to dig deeply, and work it over thoroughly for bean culture. Beans don't do well in cool soil, you will will want to wait until things have warmed up a bit, and the spring chill is gone. A little lime worked in with the soil is also helpful in the cultivation of beans.

Bush beans are planted in drills about eighteen inches apart, while the pole-bean rows should be three feet apart. The drills for the bush limas should be further apart than those for the other dwarf beans -- say about three feet. This amount of space gives opportunity for cultivation with the hoe. If runner (pole) beans start to climb too high, just pinch off the growing end, and this will hold back the upward growth.

Among bush beans are the dwarf, snap or string beans, the wax beans, and the bush limas, one variety of which is known as brittle beans. Among the pole beans are the pole limas, wax and scarlet runner. The scarlet runner is great for decorative effect. The flowers are scarlet and look just beautiful against an old fence. These are also quite lovely in the flower garden. If you are in need of a vine for your garden, this is a great choice, for one gets both a vegetable, bright flowers and a screen - all from the one plant. When sowing beans, put the bean in the soil edgewise with the eye down.

Beets:
Beets like rich, sandy loam, also. Fresh manure worked into the soil is fatal for beets, as it is for several other crops as well. But suppose that the only organic fertilizer you have available is fresh manure? Some gardeners say to work this into A selection of Beta vulgaris, known as beet ro...Image via Wikipediathe soil with great care and thoroughness. But even so, there is the danger of some of the tender beet roots being exposed to it. Here is a possible solution:  Dig a trench about a foot deep, spread a thin layer of manure in the bottom, fill in the trench with soil, and plant above this. By the time the main root strikes down to the manure layer, there will be little harm done, as the root will be large and tough enough by then, to survive just fine. Beets should not be transplanted, so you will need to direct-sow them. If the rows are one foot apart there is ample space for cultivation. Whenever the weather is really settled, and you aren't in danger of a hard-freeze, then these seeds may be planted. (Beets also make a great fall crop, if planted in late summer.) Young beet tops make fine greens, and the beet roots themselves are delicious and healthy whether steamed, sauteed, pickled, or boiled and sliced on salads. 

There are other big coarse members of the beet and cabbage families called the mangel wurzel and ruta baga. Sometimes these are raised to feed to cattle. They are a great addition to a cow's dinner, but can be to yours as well! Rutabagas are especially good in soups and stews, and taste like something similar to a turnip, but milder.

Cabbage & Its Relatives:
The cabbage family is a large one. There is the cabbage proper, then cauliflower, broccoli or a more hardy cauliflower, kale, Brussels sprouts and kohlrabi, a cabbage-turnip combination. 

Cauliflower is a kind of refined, high-toned cabbage relative. It needs a little richer soil than cabbage and cannot stand the frost. A frequent watering with manure water gives it the extra richness and water it really needs. The outer leaves must be bent over, as in the case of the young cabbage, in order to get a white head. The dwarf varieties are often the best to plant, as they grow and develop quickly, and hopefully before the cabbage worms get wind of them!

Kale is not quite so particular a cousin. It can stand frost, and actually cool weather makes it sweeter and more tender. Rich soil is necessary, and early spring planting, because it does take some time to mature. In many climates, it may also be planted in September for a tasty spring harvest.

Brussels sprouts on stalksImage via WikipediaBrussels sprouts are a very popular member of this family. Because they are small and easy to eat, many people who do not like to serve poor, common old cabbage will serve these. Brussels sprouts are interesting in their growth. The plant stalk runs skyward. At the top, umbrella like, is a close head of leaves, but this is not what we eat. Shaded by the umbrella and packed all along the stalk are delicious little cabbages or sprouts. They are very interesting to look at, and the kids may like to help grow these! Like the rest of the family, rich soil is needed and plenty of water during the growing period. In most areas, the seed should be planted in May, and the little plants transplanted into rich soil in late July. The rows should be eighteen inches apart, and the plants one foot apart in the rows.

Kohlrabi is a go-between in the families of cabbage and turnip. It is sometimes called the turnip-root cabbage. Just above the ground, the stem of this plant swells into a turnip-like vegetable. In the true turnip the swelling is Brassica oleracea var. gongylodes, Brassicacea...Image via Wikipediaunderground, but like the cabbage, kohlrabi forms its edible part above ground. It is easy to grow. You will want to eat them fairly young, as once they get too big they can get woody and lose their tenderness. Sow out as early as possible; or sow inside in March and transplant out to the garden after danger of frost is past. Plant in drills about two feet apart. Set the plants about one foot apart, or thin out to this distance. To plant one hundred feet of drill buy about half an ounce of seed - it goes a long way. Kohlrabi is served and prepared like turnip, and is a very satisfactory early crop.

Before leaving the cabbage family I should like to say that the cabbage called Savoy (sometimes also called Chinese Cabbage) is an excellent variety to try. It should always have an early planting under cover, say in February, and then be transplanted into open beds in March or April. If the land is poor where you are to grow cabbage, then by all means choose Savoy, as it does better than many of the others in less rich soil. It is also very versatile, tender, and quick cooking, so it is great for stir fry and other Asian dishes. It has a milder flavor than regular cabbage, and softer, thinner leaves.

That's it for today.  Check back in a couple of days for our wrap-up, with some more tasty veggies and cultivation tips for your spring vegetable garden!
Enhanced by Zemanta

Vegetable Gardening Resources:
    

Tuesday, April 26, 2011

Where Your Food Comes From - Video

Although this one doesn't necessarily pertain to your own gardening efforts, I think it is important to be aware of just where your other food comes from, and the impact of non-sustainable farming on the environment and our planet.

A just-released EWG study called "Losing Ground" shows that our nation's broken farm policy is harming the productive soils that are the foundation of healthy and sustainable food production.

"Losing Ground," based on innovative new research by scientists at Iowa State University -- and featured in "The New York Times" -- shows what industrial-scale crop production is doing to the land we depend on for our food. As part of this eye-opening report, EWG filmed Iowa farmland losing soil after recent rainstorms and created a short video (with Atlas Films) that highlights how federal farm subsidies and ethanol mandates are threatening healthy and sustainable food production.

If you are concerned about the food that you and your family eat and the water you drink, this is a video that you cannot miss.

foodconsumer.org - New video: Where your food comes from
New video: Where your food comes from. 04/14/2011 00:12:00 admin.
Dear Readers,. When you think of America's farmland, you probably picture waving fields of wheat and lush green stands of corn. ... EWG filmed Iowa farmland losing soil after recent rainstorms and created a short video (with Atlas Films) that highlights how federal farm subsidies and ethanol mandates are threatening healthy and sustainable food production. ...
Publish Date: 04/13/2011 20:12
http://www.foodconsumer.org/newsite/Environment/agriculture/new_video_where_your_food_comes_from_0413110714.html
Enhanced by Zemanta

Saturday, April 23, 2011

Spring Vegetable Garden Series - Crop Rotation

There is another aspect to be considered in making each vegetable do its best in your garden, and that is crop rotation, or the following of any vegetable with a different type at the next planting.

Crop rotation on a small scale.Image via WikipediaWith some vegetables, such as cabbage, this is almost imperative, but it will improve the results for most of your plants. Even onions, which are popularly supposed to be the exception to the rule, are healthier, and do a little better after some other crop,  provided  the soil is as finely pulverized and rich as a previous crop of onions would leave it.

Here are the fundamental rules of crop rotation:

(1) Crops of the same vegetable, or vegetables of the same family (such as turnips and cabbage, tomatoes and peppers, etc.) should not follow each other.

(2) Vegetables that feed near the surface, such as corn, should follow deep-rooting crops.

(3) Vines or leaf crops should follow root crops.

(4) Quick-growing crops should follow those occupying the land all season.

These are the general principles which should determine rotation of crops. The proper time to attend to this matter is when making the planting plan, before starting your garden for the season. You will then have time to do it properly, and will need to give it no further thought until the next year.

Be sure to check back next week, when we will be getting into the yummy stuff - individual vegetables, and planting/growing tips for each one!

Enhanced by Zemanta

Thursday, April 21, 2011

The Squirrel Battle - Update

Well, a few weeks ago I had posted some suggestions on keeping squirrels out of the garden - an annual and ongoing battle, for me.

giant squirrelImage via WikipediaI actually found quite a few suggestions I had not tried before, but the only one I have actually implemented so far is the spices....because I haven't needed another method!!

I am SO excited that this is working, and I would have posted sooner, but wanted to make sure the results I was getting were for real, and not just a coincidence. But it will be a month, this week, since I started trying this, and I've had virtually NO digging in my garden - whereas before, it was more than once a day.

I've still seen plenty of squirrels around, so I know they're still in the vicinity, but they just seem to be leaving my garden alone.

I had tried cayenne pepper before, but on the advice of the video I posted, I decided to try some stronger smelling spices. I had a small bottle of ground cloves in the pantry - obviously very potent, scent-wise, which I'd had for ages and never used much of. So I started with that, and just using the shaker bottle, sprinkled it around the perimeter of my tiny garden plot, and also over the area where the most active digging was occurring.  Immediately, I stopped finding holes everywhere, and my dear lettuces stopped being molested.

Cloves.Image via WikipediaEncouraged, I continued this, but my small bottle soon ran low, so I picked up a big container of ground cinnamon at Aldi's (I think I paid a dollar?). I've been using this ever since, and it seems to be working just as well, although it is more obvious to the eye - the cloves were the same color as the soil, so you wouldn't notice it, but the cinnamon now gives a rust-colored perimeter to the garden. It doesn't bother me though, and hopefully the neighbors don't care!

The one drawback is that I do need to reapply every time it rains - which, this spring, is a lot - but it only takes a minute or so, and it is working so well, I don't mind at all.

I haven't planted the potatoes just yet, but the onions are all up and growing nicely, and the gladiolas are just planted and mulched - and nothing is digging them up!

Anyway, I hope this method proves helpful for others - it sure worked for me!

If you find your squirrels impervious to spices, there were a couple other interesting suggestions I haven't tried: 1. Castor Oil mixed with water, and used to water the areas in question (this is supposed to be good for the plants as well as repelling squirrels). 2. Cotton balls soaked in peppermint oil, and tucked into the toes of old pantyhose, hung in the corners of the garden (works on the same premise as the spices, with the strong scents).

Feel free to post your own comments below! What have you used to repel squirrels from your garden?  What have you tried that has worked, or hasn't?

Enhanced by Zemanta

Tuesday, April 19, 2011

Spring Vegetable Garden Series - 3 Purposes of Cultivation

Before discussing individual  garden vegetables, I will outline the general practice of cultivation, which applies to everything you are going to grow. We will also discuss mulching, which should be done AFTER cultivation, to reduce the work you will need to do in the future.

Hoe (tool)Image via WikipediaThe purposes of cultivation are three-fold: To get rid of weeds, and to stimulate growth by (1) letting air into the soil and freeing unavailable plant food, and by (2) conserving moisture.

1. Weeds:

As for weeds, the gardener of any experience need not be told the importance of keeping his crops clean. He has learned from bitter and costly experience the price of letting them get established. He knows that one or two days' growth, after they are well up, followed perhaps by a day or so of rain, may easily double or treble the work of cleaning a patch of onions or carrots, and that where weeds have attained any size they cannot be taken out of sowed crops without doing a great deal of injury. He also realizes, or should, that every day's growth of a weed means just so much available plant food stolen from under the very roots of his legitimate crops.

2. Aeration:

Instead of letting the weeds get away with your plants' food, you should be furnishing more, and cultivation can help with this. Frequent cultivation will not only break the soil up mechanically, but let in air, moisture and heat -- all essential to convert nutrients in the soil into available plant food. Plants need to breathe. Their roots need air. Soil that is too densely packed can be difficult for new little plants to become established in; it can also hold too much water, causing your plants to essentially drown.

3. Water:

Important as air is, water ranks just as (if not more) highly. You may not see at first what the matter of frequent cultivation has to do with water. But let us stop a moment and look into it. Take a strip of blotting paper, dip one end in water, and watch the moisture run up hill, soaking up through the paper. This is called "capillary attraction". Now take a similar piece, cut it across, hold the two cut edges firmly together, and try it again. The moisture refuses to cross the line: the connection has been severed.

View of runoff, also called nonpoint source po...Image via WikipediaIn the same way the water stored in the soil after a rain begins at once to escape again into the atmosphere. That on the surface evaporates first, and that which has soaked in even just a little bit begins to migrate back up through the soil to the surface. It is leaving your garden, through the millions of soil tubes, just as surely as if you had a two-inch pipe and a gasoline engine, pumping it into the gutter! Save your garden by stopping the waste. It is very easy to cut the pipe in two. By frequent cultivation of the surface soil not more than one or two inches deep for most small vegetables, the soil tubes are kept broken, and the soil will absorb and retain moisture in more of a healthy balance. Try to get over every part of your garden, especially where it is not shaded, once in every ten days or two weeks. You can do this very quickly and easily with a hoe or wheel hoe.

The matter of keeping weeds cleaned out of the rows and between the plants in the rows is a little more time-consuming. Where hand-work is necessary, the best strategy is to do it early. Here are a few practical suggestions that will reduce your weeding work to a minimum.
  1. Get at this work while the ground is soft; as soon as the soil begins to dry out after a rain is the best time. Under such conditions the weeds will pull out by the roots, without breaking off, and thus you will not be leaving a root stock in the ground, for the weed to come up from again.
  2. Immediately before weeding, go over the rows with a wheel hoe, cutting shallow, but just as close as possible, leaving a narrow, plainly visible strip which must be hand-weeded. The best tool for this purpose is the double wheel hoe with disc attachment, or manual hoes for large plants. 
  3. See to it that not only the weeds are pulled but that every inch of soil surface is broken up. It is fully as important that the weeds just sprouting be destroyed, as that the larger ones be pulled up. One stroke of the weeder or the fingers will destroy a hundred weed seedlings in less time than one weed can be pulled out after it gets a good start. 
4. Mulching:

Spreading a soft loose mulch over cultivated soil can help it keep from becoming compacted, as well as hold moisture in, keep down weeds, and add fertilizer to the soil as it decomposes. It can also help prevent disease in your plants caused by soil organisms being splashed up onto the leaves during watering. Mulching is hugely important, and should not be ignored, as it can reduce your need for additional work and cultivation during the garden season.

Be sure to check back later this week for our next module in the series, when we will discuss the hows and whys of crop rotation for your new vegetable garden.
Enhanced by Zemanta

Cultivation Tools:
    

Saturday, April 16, 2011

Video - Planting Potatoes

Potatoes will be my main crop this year - I love them, but have not grown them in a long time. They keep well, and I don't tend to get a whole lot of them in my CSA, so I usually run out pretty quickly. Hopefully this year I will get a good harvest that will tide me over through most of next winter.

This short video demonstrates an easy method of planting a nice bed of potatoes. Check it out, and get your spring garden going! (If you haven't already!)


Planting a Spring Garden : Planting Spring Gardens: Potatoes
When planting potatoes for a spring garden, start before the heat of the summer. Start growing potatoes with the tips in this free video on gardening and farming from a professional organic gardener. Expert: Daniel Botkin Bio: Daniel Botkin is an avi...

Enhanced by Zemanta

Thursday, April 14, 2011

Spring Vegetable Garden Series - Preparing Your Garden Spot: Part 2

The next consideration when planning your vegetable garden is....

Soil profile 236x288 38.76 KBImage via WikipediaThe soil.
---------
Chances are that you will not find a spot of ideal garden soil ready for use anywhere, if this is your first time gardening. But all except the very worst of soils can be brought up to a very high degree of productiveness,  especially such small areas as home vegetable gardens require. Large tracts of soil that are almost pure sand, and others so heavy and mucky that for centuries they lay uncultivated, have frequently been brought, in the course of only a few years, to where they yield annually tremendous crops on a commercial basis. So do not be discouraged about your soil. Proper treatment of it is much more important, and a garden- patch of average run-down, or "never-brought-up" soil will produce much more for the energetic and careful gardener than the richest spot will grow under average methods of cultivation.

The ideal garden soil is a "rich, sandy loam." And the fact cannot be overemphasized that such soils usually are made, not found. Let us analyze that description a bit, for right here we come to the first of the four all-important factors of gardening food. (The others are cultivation, moisture and temperature.) "Rich" in the gardener's vocabulary means full of plant food; more than that - and this is a point of vital importance - it means full of plant food ready to be used at once, all prepared and spread out on the garden table, or rather in it, where growing things can at once make use of it; or what we may term, in one word, "available" plant food. Practically no soils in long- inhabited communities remain naturally rich enough to produce big crops. They are made rich, or kept rich, in two ways; first, by cultivation, which helps to change the raw plant food stored in the soil into available forms; and second, by manuring or adding plant food to the soil from outside sources. (See previous posts on this blog on composting for some great tips on making your own natural plant "food.")

"Sandy" in the sense here used, means a soil containing enough particles of sand so that water will pass through it without leaving it pasty and sticky a few days after a rain; "light" enough so that a handful, under ordinary conditions, will crumble and fall apart readily after being pressed in the hand. It is not necessary that the soil be sandy in appearance, but it should be friable.

universal potting soilImage via Wikipedia"Loam: a rich, friable soil," is the definition Webster gives. That hardly covers it, but it does describe it. It is soil in which the sand and clay are in proper proportions, so that neither greatly predominate, and usually dark in color, from cultivation and enrichment. Such a soil, even to the untrained eye, just naturally looks as if it would grow things. It is remarkable how quickly the whole physical appearance of a piece of well cultivated ground will change, and you will soon be able to often recognize good (or at least decent) garden soil just by sight.

Check back next week for the next part in the series, when we will talk about vegetable cultivation, proper crop rotation, and more!

Enhanced by Zemanta

Tuesday, April 12, 2011

Spring Vegetable Garden Series - Preparing Your Garden Spot: Part 1

It is finally (FINALLY) spring here in Ohio, and I am inspired to post a spring garden series. This will focus on vegetable gardening - growing your own vegetables I feel is such an important part of living a sustainable and holistic lifestyle. As you have probably discovered from reading this blog, even apartment and condo dwellers can practice sustainable gardening - you just need a bit of creativity!

vegetablesImage via WikipediaI will try to throw some tips in for us small-space gardeners throughout the series, so stay tuned, and lets get gardening!

Choosing and Preparing Your Garden Spot:

In deciding upon the site for the home vegetable garden it is well to dispose once and for all of the old idea that the garden "patch" must be an ugly or plain spot in the home surroundings. If thoughtfully planned, carefully planted and thoroughly cared for, it may be made a beautiful and harmonious feature of the general scheme, lending a touch of comfortable homeliness that no shrubs, borders, or landscaping can ever produce.

With this fact in mind we will not feel restricted to any part of the premises merely because it is out of sight behind the barn or garage. In the average moderate-sized homestead there will not be much choice as to land. It will be necessary to take what is to be had and then do the best you can with what you have. But there will probably be at least some choice available as to, first, exposure, and second, convenience.

Vegetable GardenImage by agelakis via FlickrConsideration #1: Exposure
---------
The first thing to consider in picking out the spot that is to yield you happiness and delicious vegetables all summer, or even for many years, is the exposure. Pick out the "earliest" spot you can find a plot sloping a little to the south or east, that seems to catch sunshine early and hold it late, and that seems to be out of the direct path of the chilling north and northeast winds. If a building, or even an old fence, protects it from this direction, your garden will be helped along wonderfully, for an early start is a great big factor toward success (especially in cooler climates with shorter growing seasons). If it is not already protected, a board fence, or a hedge of some low-growing shrubs or young evergreens may be a great addition to your gardening efforts, that will pay off well over time. The importance of having such a protection or shelter is altogether underestimated by the amateur.

Consideration #2: Convenience

 ---------
Other things being equal, select a spot near at hand, and easy to access. It may seem that a difference of only a few hundred yards will mean nothing, but if one is depending largely upon spare moments for working in and for watching the garden and in the growing of many vegetables, this matter of convenient access will be of much greater importance than at first you might think. Not until you have had to make a dozen time-wasting trips for forgotten seeds or tools, lugged a big heavy hose out to the garden and back, or gotten your feet soaking wet by going out through the dew-drenched grass, will you realize fully what this may mean.


The next consideration will be the soil, and we will cover that on Thursday, so be sure to check back for some great tips on preparing great soil for your vegetable garden.

Enhanced by Zemanta

Saturday, April 9, 2011

Seven Small Sustainable Garden Tips

If you have a tiny yard and would like a simple but well-maintained garden, you only need two things - determination and know-how.  Here are some tips on how to keep your small sustainable garden looking spruced up and glamorous.

Deadheading PerennialsImage by Chiot's Run via Flickr1. Deadhead.
Keep your border free from wilted flowers and dried leaves. Deadheading or removing dead flower heads will encourage the plants to produce more blooms for longer. Many perennials such as geraniums and dahlias, and some annuals, benefit from having spent blooms removed.

3. Pinch out tops.
Certain plants - especially foliage plants like Coleus - respond with a spurt of growth when their tops are pinched out. Pinching out makes the plant much bushier and so more blooms are produced. Fuchsias are prone to becoming leggy unless they are pinched out.

4. Fertilize lightly.
A minimal amount of fertilizer will further boost the growth of your vegetation. (However, too much can minimize fruiting of your vegetables, as the energy will be directed into the foliage rather than the fruits, so hold off on fertilizing, or reduce the amount, once plants become ready to start setting fruits.) If you water your yard frequently, you have to fertilize it more regularly because of nutrient depletion. A fortnightly application of liquid fertilizer is sometimes more beneficial than granules as it is more readily absorbed by the leaves. Container plants will be considerably healthier with a half-strength solution of liquid fertilizer applied regularly.

5. Weed out.
This is one of the best ways to preserve the beauty of your small garden.  Remember, weeds compete with your plants for both nutrients and moisture. If the weeds are not close to seeding, leave them on the bed to rot down for mulch. This will add nutrients back to the soil, and also provide a cover to prevent future weeds from springing up, so it's a great tip for your sustainable garden.

micro asian mixed greensImage by Cpt. Obvious via Flickr6. Water well.
One good tip when it comes to watering your garden is to give it a thorough soaking once a week (while making sure there is no run-off to cause erosion). Deep watering will encourage the growth of deeper roots that will be able to withstand dry spells weatherwise. Watering more frequently and shallowly will lead to shallow roots which constantly need to be watered, so it's a vicious cycle. Drip irrigation or a soaker hose is a great way to do this (see below, or visit http://www.newholisticliving.com/sustainablegardening.html for some resources).

7. Say NO to chemicals.
Chemicals are dangerous to humans and animals, pollute the soil and groundwater, and and often kill the natural predators of the pests in your garden, so avoid them if at all possible. There are many organic alternatives that work just as well. (For some organic and natural suggestions, visit http://www.newholisticliving.com/sustainablegardening.html.)

With these simple tips, your small garden will soon be the envy of your neighbors.
Enhanced by Zemanta

A Few Small Garden Resources:
   

Thursday, April 7, 2011

Sustainable Gardening: Choosing and Planting Perennials

If you’ve been growing a vegetable garden for a while, you might be wanting a bit more showiness, as vegetable gardens alone can sometimes look rather plain (although you can certainly grow some colorful vegetables to add some contrast). The use of perennial flowers is a great sustainable gardening technique that can also be a great way to liven up your garden without adding a lot of extra work.

Borage, also known as "Starflower" (...Image via WikipediaPerennial flowers are strong, local or native flowers that come back every year without having to replant or do any extra work. During their off seasons, the flowers and stems die back and you can hardly even tell the plant is there. When it’s time to bloom, entirely new flowers shoot up where the old ones were.

Before deciding whether to put in perennials or not, you need to make sure that your soil has proper drainage. If the soil stays saturated with water for long periods of time, you should build a raised bed. To test, dig a hole and fill it with water. Wait a day, and then fill it with water again. All traces of water should be gone within 10 hours. If the hole isn’t completely dry, you will need to build a raised bed.

Picking your perennials can be a complicated process. The goal should be to have them flowering as much as possible during the year, so you should create an outline of the year. Research the different types of flower you want, and create a timeline of flowering. If you plan it right, you can have a different type of flower blooming at any point in the year. Getting just the right mixture of seeds can give your yard a constantly changing array of colors.

Assorted flowers in Park Seed Company GardenImage via WikipediaWhen you go to buy the seeds from your local florist or nursery, you might be able to find a custom seed mixture for your area. This takes the really tough research part out of the job. Usually these blends are optimized for the local climate, and thus may be grown very sustainably - practically on their own. If one of these isn’t available, you can ask the employees what they think would be a good mixture. They should be happy to help you put something together which will be optimal for whatever you desire.

You should definitely use mulch when planting perennials. This will reduce the overall amount of work you have to do later on, by reducing the amount of weeds and increasing the water retention. Bark or pine needles work great, I have found, and depending on the rest of your yard you might have them on hand at no charge. As for fertilizer, you should use an organic fertilizer only sparingly once your plants start to come to life.

When you actually go to plant the seeds, you should put them in small, separate clumps according to the directions. This is because they tend to spread out, and if you have too many too close together then they will end up doing nothing but choking each other out. As you plant them, throw in a little bit of weak fertilizer or some compost. Within a few months, you should have a well-established variety of perennials, which will continue to decorate your garden year after year in a natural and sustainable way.

Enhanced by Zemanta

Tuesday, April 5, 2011

Spring Gardening Resources

If you haven't gotten the gardening bug yet this year, it's just around the corner! I am chomping at the bit for it to get warm enough to get out and get in the dirt, and now that it's April, I know it has to be coming soon! I am getting ready to add last summer's compost to the garden, turn it in, and cover it with black plastic for a couple of weeks to try and warm up our cold soil a bit early this season.

Here a couple of spring gardening resources. If you are a new gardener, this is a great time to check out a garden workshop. The one linked below is in California, but many areas have free garden workshops through a community center or other venue. Check out your local paper or community center classes for a listing.

Brookgreen Gardens - sculpture gardenImage via WikipediaFree spring garden workshops - OC Deals - The Orange County Register
Tweet Share Like to grow things? Check out these free upcoming gardening workshops at the Great Park with free parking. They all take place Saturday mornings at 10 a.m. in...
Publish Date: 03/31/2011 15:42
http://ocdeals.ocregister.com/2011/03/31/free-spring-garden-workshops/90655/

Check out this blog for one garden's early spring preparations:

Spring Garden Acre: Preparing Rows
Spring Garden Acre is a blog about our family's gardening adventures. We call our place Spring Garden Acre, because we live on Spring Road with about an acre for gardening. We're located in zone 6b of south central PA. ...
Publish Date: 04/02/2011 13:00
http://springgardenacre.blogspot.com/2011/04/preparing-rows.html

This blog shares episodes of a radio show on gardening, and in this episode, offers ideas on planning your spring garden:

Episode 68 – Implementing the Spring Garden Plan | The Self ...
Episode 68 – Implementing the Spring Garden Plan. By Jason, on March 31st, 2011. Making a plan is not too hard. Implementing a plan…well that can be more interesting. Especially for someone like me who just can't follow rules, ...
Publish Date: 03/31/2011 23:01
http://theselfsufficientgardener.com/episode-68-implementing-the-spring-garden-plan
Enhanced by Zemanta

Saturday, April 2, 2011

Landscaping Your Garden with Layering

It's spring, and our thoughts are turning to gardening.... If your garden needs a bit of landscaping, now is the time to do it, before you get a bunch of stuff planted. But don't get discouraged at the thought of all the work ahead - this can be an exciting project, because there is nothing more fun than garden landscaping -- it will get your imagination working overtime and you will have a ball planting and rearranging your plants and flowers!

A poster with twelve species of flowers or clu...Image via WikipediaLayering is a great way to landscape your garden in an effective and attractive way. By layering your garden landscaping beds you will be able to add a whole other level of beauty to your landscaping design. Your yard is the first thing that people will see when they come to your house, and giving a grand tour that includes a fabulous garden is always fun and exciting.

Layering your garden landscaping design is easy to do. You need to know the flowers that you are going to plant first however. The choices that you make as far as the flowers and other plants will affect the way your garden landscaping is laid out. For example you do not want to have the taller plants in front of the shorter ones. This is obvious but you should still make a rough sketch of where you want things laid out before you begin. This will help you to keep things as simple as possible. Your garden landscaping will go a lot faster this way and you will run into fewer problems as you go.

Leonardslee Gardens, West Sussex, UK | Kaleido...Image by ukgardenphotos via FlickrWhen layering you should have about three layers. Your back row should face north, if it can, and the back row should have the tallest plants and as the rows descend so should the heights of the plants and flowers. The trick of this kind of garden landscaping is that oftentimes the plants we buy are baby plants. So you will need to talk to those working at your local gardening store about how large the plants will grow to be. (If planting from seed, be sure to check the packages for approximate plant heights.) This is key to successful garden landscaping. If the front or middle row of your garden landscaping design is going to grow much higher than the last row, then you will have to do some rearranging.

The layering affect of your garden landscaping design will add depth and make your garden much more interesting to look at. This is what will make your garden landscaping a success. So build some layers, and have some fun!
Enhanced by Zemanta