Thursday, August 30, 2012

Tips for Successful Worm Composting

For many worm farmers, the thought of having a personal supply of nutrient rich soil for the garden or flower beds is a great motivating factor. But many gardeners are intimidated by the idea of starting a personal worm farm - it may sound complicated and a lot of work to maintain. But it's actually pretty simple and can provide you with great compost a lot faster than traditional composting methods. Here are a few tips to help get your worm composting endeavor off to a successful start.

Setting Up Your Worm Farm - The Bin

English: Freshly bedded worm bin, garden waste...
Freshly bedded worm bin, garden waste mixed with finished aerobic compost. (Photo credit: Wikipedia)
In terms of setup, worm bins are now readily available for purchase on the Internet.  Various sizes, shapes, and colors add to the selection.  Current large scale worm farmers will often sell small set ups for a comparable price. 

Other than purchasing a unit online or through a commercial worm farmer, set ups can be made at home out of a number of household items.  Plastic tubs or large wooden boxes can be altered and provide a perfect home for these working worms. 

Multiple layers are needed to provide a space for the liquid at the bottom.  The liquid will run off the soil above and can be drained via a tap or hole at the bottom of the container.  Within the upper layer of soil, the worms can move about towards the material to be composted.

Numerous models that can be purchased are also available for indoor use for those with limited or no outdoor space.  Worm bins can typically be stacked for adding more worms later on. 

Bedding & Location:

Appropriate bedding will need to be provided for the worms to ensure a healthy life cycle.  Peat moss or coconut fiber containing a small amount of compost material is well accepted.  Bedding should always be moist for worms.  Many prepackaged worm bins come complete with bedding and set up instructions.

Location of the bin is important as well.  Worms are unable to tolerate extremes in temperature.  A location where temperature can be controlled between 72 - 75 degrees Fahrenheit, or choosing a fully insulated system, will help keep the worms healthy and happy.  The level of moisture within the bin can be affected by location too.

Worms and fruit fly pupas under the lid of a h...
Worms on a worm bin lid. (Photo credit: Wikipedia)
Adding The Worms:

Once a bin has been chosen and prepared, the worms will need to be added to start the farm.  Various worms are readily available.  Red Wigglers are the best choice for composting farms while European Night Crawlers are best for live bait if you're into fishing. 

When worms are purchased, they typically come with acclimation instructions. An important step is to be sure the bedding and unit are fully prepared before the worms arrive for placement within the farm. 

Feeding:

Feeding the worms is the fun part.  They can consume any number of items to be used as compost including fruit and vegetable scraps, egg shells, paper products, cotton rags, soaked cardboard boxes, leaves, dirt and hair.  Items should be cut down to manageable sizes.  Fruits should be sliced into strips for easier consumption by the worms. 

Place a layer of items to be consumed on the top layer of the soil.  To avoid over feeding, only add more food when most of previously fed food has been eaten. 

Using Your Worm Compost:

Worm castings can be found in the bottom layer of the soil.  This natural fertilizer can be added directly to flower beds and gardens.  A liquid fertilizer can be made by adding water to castings for plants and flowers that prefer to be fed directly at the roots. 

Worm farming is relatively low maintenance.  If the habitat is less than desirable, the worms will often simply crawl away in search of better living conditions.  Keeping the temperature constant, moisture at an appropriate level and food readily available will help ensure a healthy and happy supply of working worms - and a great supply of organic fertilizer for your garden!


Worm Farm Composting Kits & Bins: 
   
Enhanced by Zemanta

Tuesday, August 28, 2012

The Basics of Vermiculture (Worm Composting)

If you're an organic gardener, you're probably quite familiar with composting. But you may not have heard as much about vermiculture. What is vermiculture?  It is quite simply, composting with worms.  Composting is the practice of breaking down organic matter to create natural fertilizer.  It’s great for gardening and a very sustainable practice.  Vermiculture facilitates the composting using the natural decomposition abilities of worms.  It uses a worm’s natural abilities to make great fertilizer out of organic waste.

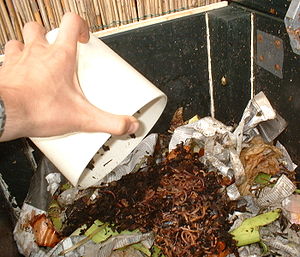
English: Composting-worms just added to a fres...
Composting-worms just added to a fresh batch of garbage in a self-made worm-bin. (Photo credit: Wikipedia)
What Types of Worms Can Be Used in Vermiculture

Not all worms are good for a home composting set-up.  In fact, some types of worms can't be used for any type of composting system.  However, a handful of worm varieties do make great organic composting partners.  They include:

* Red wigglers
* European night crawlers
* Belgian night crawlers
* Blueworms

Of all of these types of earthworms, the red wigglers are the most common worms used in vermiculture.  All worm types can be found in your local nursery, live bait shop, and of course ordered online - because who doesn’t want to receive a box of worms in their mailbox!  :-)

What Do Worms Eat?

Not everything can be composted.  However, vermiculture does lend itself to more options than standard composting.  Worms can eat:

* Fruit and their peels
* Vegetables and their peels
* Pulverized egg shells
* Tea bags
* Coffee grounds

They can also eat meat and dairy products, oily foods, and grains.  However, these items tend to smell something awful and most people don’t recommend composting them.

Materials To Compost With Worms At Home
English: The inside of a worm composting bin, ...
The inside of a worm composting bin, after the worms have eaten many kitchen scraps. Note the castings on the sides of the bin. (Photo credit: Wikipedia)
It’s actually very easy to set up a worm composting system in your home.  To get started you’ll need:

* A bin – a wash bin or commercial worm bin are both great options.  It doesn’t need to be deep because the worms like to hang out near the surface.  If you’re using a wash bin, you’ll want to drill holes in the bottom for drainage.  You’ll also want a cover for your bin.

* Bedding – newspaper works the best because it’s easy to access.  Shred it and dampen it before placing it in your bin.  Add a few handfuls of soil and you’re ready to add the wigglers.

* Worms

* Food to compost – the ratio is one pound of food waste per day to two pounds of worms.  If you have fewer worms, reduce the food waste accordingly.

Place your worm bin in a room with moderate temperatures that is easy enough to access.  Options might include your kitchen, basement, outside the back door or in your laundry room.  When your compost is ready, it will resemble a dark, rich soil.  You can use it in your garden or place around houseplants. 

Be sure to check back Thursday when we will share some tips for making sure your worm composting venture is a success!  Or check out the very helpful book Worms Eat My Garbage: How to Set Up and Maintain a Worm Composting System.


Enhanced by Zemanta

Saturday, August 25, 2012

Video - Fall Gardening

This short video gives a few quick ideas on what to grow in the fall. A number of plants grow better in cooler weather, including many tasty vegetables! If you live in a Southern climate, you may even be able to harvest vegetables from your garden year-round. But even in cooler climates, if you don't have a greenhouse or much space, you can still harvest well into the fall and early winter months, as he demonstrates in this video. (See resources below the video for some more great ideas on this topic.)

Enjoy the possibilities!

Fall Gardening
Master Gardener Kent Phillips talks about planting in the fall and overwintering plants through the cold months of the year. Many people think that gardening season is over when summer ends, but you can continue planting in autumn and produce delicio...


Year-Round Gardening Resources:
   

Thursday, August 23, 2012

Planting in Fall For A Spring Garden

You might think of the autumn simply as the time to clean up, removing the previous summer's growth from your garden. There might still be some specialized flowers and vegetables growing through the fall, but the emphasis at this time of year is to wind things down, and wait for the spring to do all the new planting. Yet, for some plants, the best time to be put in the garden turns out not to be the spring at all.

An autumn ground with fallen leaves and grass ...
An autumn ground with fallen leaves and grass (Photo credit: Wikipedia)
Some plants, in fact, do much better if they are planted in the autumn rather than in the following spring. That doesn't mean they bloom and grow all winter; they'll lie dormant like many other plants through this period. However, planting in the fall and letting them start their growing season gradually as things warm up in spring works better for some plants.

Most perennials actually thrive by this process, because the soil is still relatively warm and moist from the summer, and they have time to become properly rooted throughout the autumn. If they're planted in the spring, on the other hand, the soil is still quite cool, and the plants face a few months of trying to root properly even while the above-ground temperatures are inducing them to produce leaves and flowers. An especially hot summer can place additional stress on these new plants, and particularly for some fruit-bearing bushes and trees, can even kill them. Perennials planted in the fall have a much better chance of being established and attaining their full size and growth the following summer, than do similar plants that are planted in spring.

There are a number of shrubs and trees that establish themselves better if you plant them in the autumn. Your garden center or some research on gardening websites can help you discover which other plants thrive best if put into your garden at this time of year. However, some plants that you might consider could be Siberian or bearded irises, lilies, peonies, hostas, pinks, hens and chicks, or phlox. Trees or bushes like hawthorn, maple, crab apple, pine, linden, and elm should also be planted in the fall rather than the spring.

Another thing people don't always think of in the autumn is planting seeds rather than the plants themselves. When you think of it, nature's way generally tends to be for seeds to drop and be spread in the fall, and get covered over and lie dormant through the winter, in preparation for germinating the following spring. Some actually require a spell in cold temperatures before they'll sprout. So in your own garden, too, you can plant certain seeds that will then wait through the winter and begin to grow the following spring. Try this with some of your perennials, and you can even give it a go with annuals that are described as "hardy annuals." This will also work with some self-seeding herbs and flowers, such as cilantro, Four O'Clocks, and datura ("moon flowers"). For me, I can never seem to get cilantro to grow well if I plant it in the spring or summer - it always bolts too quickly and hardly makes any leaves. If I plant it in the fall (or it seeds itself), it comes up by itself in the spring and grows large and lush before it gets too hot.

Garden with some tulips and narcissus
Tulips and narcissus flowers in spring (Photo credit: Wikipedia)
Of course the one fall planting that everyone is familiar with is the bulbs. Tulips and daffodils, snowdrops and crocuses - all of these should be planted in the autumn before the soil freezes, at least six weeks earlier or slightly more. You might already have been doing this, but now you know that your repertoire for fall planting can be considerably wider. If you plant what you can in the autumn, you will probably end up with a thriving, growing garden much sooner the following spring than you've had before. Plus you don't have to stop gardening yet! :-)

Enhanced by Zemanta

Tuesday, August 21, 2012

A Few Tips On What to Plant In A Fall Garden

Well, I spotted a few yellow leaves this week.... Sad as it may be, it seems this summer is already drawing to a close (wow - that was fast!). But that doesn't mean gardening is already over! As autumn arrives and you look out the window into the yard, you may be thinking that that's pretty much it for your garden. All the vegetables have been harvested, the annuals have run their course, and it's time to wind things up. Dig up and toss the annuals, prepare the soil and some of the plants for next year, and then leave the garden alone for the next several months. All done.

Fall Planting in Progress (Photo credit: EatandLiveGreen)
However, that isn't necessarily the case. Your garden may, in fact, be far from done, and you can give it life for a few more weeks. It may come as a surprise, especially if you're a novice gardener, but there are actually some things you can plant in the autumn rather than in the spring, and some things that might even keep growing through the first frosts. Far from winding down all your garden activities, you can still be out there, planting, watering, and pruning to your heart's content.

Some flowers, like pansies, for example, actually prefer cooler weather. So in a way, you can bracket your entire growing year with pansies and the related violas, starting them early in the cool spring, and then planting more in the cool autumn. Certain types of impatiens plants also seem to do quite well as the hot summer gives way to cooler autumn temperatures. It's long been known, too, that ornamental (and edible!) kales and cabbages last long into the autumn, and mums are another very hardy flowering plant that you can use to brighten up the garden.

Root Vegetables
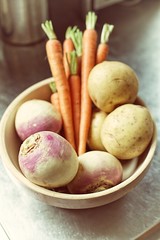
Root Vegetables (Photo credit: frank3.0)
Certain vegetables can also still be growing in the autumn, though they would have been planted a bit earlier in the season. In Zone 5 and further south, for example, you can plant root vegetables in August, to bring in a harvest before the first frost. This would include things like beets and turnips, and possibly green onions and shallots as well. So you can extend your harvest into the fall, even if you planted earlier than that.

You can also check for seed packets in early August, looking for vegetables that can be planted even later. You can ask the advice of the local garden center to be sure which ones work best for your Zone, but look for the ones that list the shortest growing season on the packet. For these vegetables, you would prepare the garden beds all over again, removing all dead and finished vegetation and spreading fresh mulch and compost so that some nutrients are restored to the soil. Some vegetables (including root vegetables like beets and carrots, and leafy greens like lettuce, mustard, collards, and kale) can even grow through the first early frosts and yield a harvest for you - some will even taste sweeter, as the cool weather brings out the sugars in the plants.

As you put some parts of your garden to bed for the autumn and winter, other parts can still be vital and growing, while still others can be planted afresh and begin a new growing season entirely. If you enjoy your gardening and really don't want to let it go yet, there are ways to extend the pleasure just a little longer. Bring in some mums and pansies and plant some root vegetables and greens, and let the gardening continue for several more weeks - or maybe even months!  (And if you want to try gardening year-round - which I am trying this year for the first time myself - see Eliot Coleman's excellent book, The Four-Season Harvest.)

 
Enhanced by Zemanta

Saturday, August 18, 2012

Video - The Importance of Organic Gardening

This short video offers a basic introduction to what organic gardening is, and why building a healthy soil is the most important first step. It's a pretty basic video, but it does emphasize the interconnectedness behind the philosophy of natural, organic, and sustainable gardening, and reveals some fascinating facts and examples you may not know about how all the interconnected plants and organisms work together.

It's worth a quick watch, even if you are already familiar with organic gardening. And be sure to check out the valuable related resources I've listed below - they will really open your eyes to just how important growing organically really is.

The Organic Garden
Stephanie Donaldson is the garden editor for Country Living Magazine and a passionate gardener and environmentalist. In this 4 week course she shares her love of all things natural and this course is a must for anyone who cares about their environmen...
 

Related Resources:
     
Enhanced by Zemanta

Thursday, August 16, 2012

Creating Healthy Organic Soil for Your Organic Garden

When you are trying to get started with organic gardening, you may think of buying heirloom plants and seeds, avoiding pesticides, or rotating your crops for the best yield. But organic gardening actually begins several steps earlier than that, with your preparation of the soil itself.

After all, apart from using water and sunlight to energize the process, this is where the plants will acquire most of the nutrients they need to grow properly. If they don't have nutritious soil, you won't get very healthy plants, which will likely defeat your purpose in trying to garden "organically" in the first place.

Cover of "Your Organic Garden (A Rodale G...
Cover via Amazon
So what is necessary for nutritious, healthy soil, as a foundation for your organic garden?

You'll need to do some research to refine the details, and it will be best if you consult with an organic gardening expert or read up on it if you're really serious about this (I can recommend some good books for you). But here are a few basic tips to start with.

There are four prime ingredients that your soil must contain: lime, phosphate, marl (potassium), and humus.

Lime, in the form of ground limestone, helps maintain a good pH balance, and must also contain magnesium and calcium for good plant growth. Phosphate provides the phosphorus that all plants need, and should be applied in your garden once every four years. Marl is rock powder that contains potassium, which works hand in hand with the phosphorus.

All three of those things should be applied with the help of a consultant. And it would probably be a good idea to start with soil testing in your garden first, to make sure what the existing levels are. That will help determine just how much of each element you need.

Humus, meanwhile, is essentially compost. You can buy this at an organic gardening supply store, and it can be made either of animal manures or from a vegetable base. In fact, you can create your own compost at home, starting with a base like straw, and adding vegetative matter like the leaves you raked up from your lawn as well as some of the remains of the previous year's garden. And one of the best sources of materials will be vegetable peelings from your own kitchen.

Real Compost
Real Compost (Photo credit: Wikipedia)
You can buy compost bins, with instructions on other materials to add that will give you a rich source of organic matter to work into the soil of your garden. If you just want to develop a compost pile yourself, without a lot of extra cost, you would still be wise to do some online research or speak with organic gardening experts, for advice on how to go about it. There are pitfalls you'll need to avoid, that you might not even think about. For example, while the compost pile should be damp, it shouldn't be allowed to get too wet. And although you can use the remains of the previous year's garden, if you had plants that had a serious insect problem, those leaves and branches should be discarded and not put into the compost pile. (Or just browse the archives of this blog for a number of helpful composting articles and tips.)

You can create a genuinely organic, healthy and sustainable garden if you start at the foundation: preparing the soil so it will contain all the nutrients your plants will need.

Some Helpful Organic Gardening Books:
   
Enhanced by Zemanta

Tuesday, August 14, 2012

What Makes A Garden Organic?

There's a lot of talk these days about organic foods, organic farming, organic gardening, organic this and that. The word "organic" is becoming as prolific in advertising as the phrase "new and improved" used to be. Sometimes this word is thrown around so much, one may become a bit confused about just what makes an organic garden.

But isn't everything that grows in the ground, or for that matter every creature that lives, pretty much "organic" by definition, you might ask? That is one interpretation of the word, but it's not really what is meant by the phrase organic gardening.

English: red earthworm, picture taken in soil ...
Red earthworm, picture taken in soil from organic gardening (Photo credit: Wikipedia)
The main emphasis of "organic" gardening is on doing things by natural means, and most particularly doing things with as few chemicals as possible. The health of the soil and the plants is maintained in natural ways, without the use of synthetic chemical fertilizers, pesticides, and herbicides. The gardeners (or, on the larger scale, farmers) pay attention to the relationship of all the elements in the garden itself: soil and the organisms that inhabit it, the actual plants themselves, and even the insects or birds that might feed from the plants. And the focus is not just on the garden, but on its relationship to the wider ecology around it.

The ultimate goal is to produce plants, flowers, and fruits that are as healthy and natural as possible, and to do it in a way that benefits or doesn't harm the environment.

So is that it? Just stop using pesticides, and a garden is "organic"?

That can benefit the garden, of course, but there's much more to it than that. The mere act of ceasing to use chemicals doesn't necessarily make a garden organic (or sustainable).

Conservation is another major element of organic and truly sustainable gardening. Various methods are used to conserve both water and soil nutrients. For example plants may be chosen and planting methods used that will allow the gardener to conserve water while getting the greatest benefit from it. Crops may be rotated, even in a small garden, so that the soil nutrients will not be depleted. Plants can be placed together in the garden beds in ways that will avoid competition for nutrients. And certain kinds of plants can be grown for the purpose of turning them back down into the soil, to serve as "green manure," a non-animal-derived compost.

Rabot-Blaisantvest2009 10 00 144
(Photo credit: Wikipedia)
Even so-called "pests" may be viewed differently in organic gardening. The gardener may research the insects in his or her own garden and realize that certain ones are actually beneficial to particular plants, so those bugs will not automatically be eliminated. Or if there are insects that need to be removed, often they can be controlled by setting up bird houses to bring in natural predators, or introducing other insects like ladybugs into the ecology. Natural home-made pest-control sprays can be made or, if absolutely necessary, there are organic pesticides that can be used sparingly.

The point to "organic gardening" is that a garden is created that works with the natural ecology, rather than trying to circumvent it. And the vegetables and flowers produced by that garden will be healthier and usually even tastier than those produced by less sustainable means.

Find more sustainable gardening tips here: http://www.newholisticliving.com/sustainablegardening.html


Enhanced by Zemanta

Saturday, August 11, 2012

Video - How to Rotate Your Crops

This video gives you a good overview of how to design a sustainable garden rotation plan. (You may want to view it full-size, as he does a bit of drawing and typing of crop names.) You can draw this out on paper, and just keep a garden ledger - rotating beds in sequence each year like he describes is very helpful, as it's easier to keep track of, and you can plant crops which will benefit from coming after the previous crop. This works well even in very small gardens - especially if you can do multiple succession plantings throughout the year, although you may need to add additional compost or organic fertilizers if you're gardening a small area heavily.

How to rotate your crops! Crop rotation. HD
Organic Gardening, Beekeeping and Seed Swapping Network workwithnature-info.webs.com This is a Sketch on how to make your own crop rotation. It is the tool for organic gardeners, to prevent harmful pests attacking your plants. It is the cornerstone i...

Enhanced by Zemanta

Thursday, August 9, 2012

Using Crop Rotation In Your Organic Garden

You may think that crop rotation is only useful on a large scale, for such things as farming, but the principles underlying this idea are exactly the same in a small garden as on a big farm. So what exactly is crop rotation? And what are these principles?

English: Crop rotation on a small scale at The...
Crop rotation on a small scale at The Ecological Garden at Odder. (Photo credit: Wikipedia)
Rotation is the practice of changing which crops you grow in a particular location each year. And there are two important reasons why this switching of crops is beneficial both to the soil and to the plants.

First of all, the various plants take different nutrients out of the soil, so having the same crop in the same location all the time will eventually deplete the soil of those nutrients. At this point, some way must be found to replenish those elements, or it will become impossible to grow anything in that spot. The lack of rotation is often why some growers discover they need more and more chemical fertilizers if they continue planting the same crop in the same spot. This practice is often considered to have been a major factor in the Dust Bowl of the 1930s.

Another main reason for rotating crops is pest control. If pests that attack a certain plant are given a chance, year after year, to build up in the same location, the plants will be less and less healthy each year. (This may have been what occurred in the Irish Potato Famine in the mid-19th century.) But if a new plant is put in that location, so that the pests already living in the soil do not have anything to feed on, the pests will die away and the plants will be healthier.

So rotation of crops, large or small, is very important to the flourishing of an organic garden. It's one of the elements that helps you to avoid the use of pesticides and fertilizers, and it keeps the soil healthy.

But there's something of a method to crop rotation. If you plant specific types of crops one after the other, each one helps to refresh the soil in certain ways that make it beneficial for the crop that's planted in the next season. There is a lot of information available online that can help with this, and several books I can recommend as well.

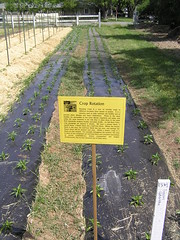
Soil Born Farm: Crop Rotation
(Photo credit: Annie&John)
The Helpful Gardener website narrows rotation down between plants that need nitrogen and those that "fix" nitrogen in the soil so that it can be accessed by nearby plants that need it. If you operate by this principle, you will need to do extensive research to make sure you know which plants are which.

The Tanger Green website tries to use a few more specific examples, such as following squash or potato crops with carrots the next year. This site also suggests you take note of which crops should be planted next to each other. For example, it cautions against growing potatoes and tomatoes side-by-side, since both of them come from the same family, and would tend to deplete the soil very heavily of the same nutrients.

The Spiritual Sky website, however, goes into more detail about a suggested order for crop rotation: legumes, then cabbages (and other members of the "brassica" type of vegetable), then tomatoes, followed by onions, and finally root vegetables. Or, if you want a more generalized rotation, the site suggests brassicas (broccoli, cauliflower, cabbage, radish, etc), followed by root crops (beets, carrots, potatoes and so on), and then an "others" category (which could include eggplants, beans, peppers, cucumbers, onions, peas, tomatoes, etc).

My favorite book that covers this in detail is The 4 Season Harvest, by Elliot Coleman. The extensive appendix and the end goes into dozens of crops and how to grow them the best and healthiest, including what crops do well before and after each one.

If you take what steps you need to make your garden soil healthy and full of nutrients, and then practice crop rotation from year to year, you will likely have fewer problems with pests attacking your plants, and will end up with some very vigorous plants and great vegetables at the end of the season - all in a very natural and sustainable way, and without the use of chemicals.

Learn More About Crop Rotation for Organic Gardening Here:
   
Enhanced by Zemanta

Tuesday, August 7, 2012

Keeping Your Summer Garden Green Longer

There are many things we do to add a little splash of color to our summer gardens but wouldn't it be nice to prolong the life and enjoyment of our summer garden, and keep it looking lush a green just a bit longer?  This article will give you a few tips to keep your summer garden looking crisp and green as long as possible by taking a few extra steps a little earlier in the summer months to prepare for the inevitable beginning of the end.

One thing to keep in mind is that once your garden begins to take on that yellowish brown hue that indicates the end of summer it always seems to be a downhill ride into the fall. That ride, more often than not is over far too quickly and your summer garden is but a dim reminder of its formerly glorious summer greenery.

Photo taken from a back garden in Birkenhead, ...
 (Photo credit: Wikipedia)
1. First things first, get rid of the yellowing leaves and dying flowers as they make their appearance. They rob the remainder of the garden of its splendor and leave the pallor of decay on the garden far too soon in the season. You will be glad you did, as it will immediately restore the look of health and vitality in your remaining garden plants.

2. Weed. Remove those pesky weeds that detract from the beauty and lushness of the greenery in your garden. By removing the weeds your entire garden looks better almost immediately. While you are at it, reapply mulch. This will delay the inevitable return of the weeds while also providing an extra layer for holding in moisture to keep your plants from drying out and losing their bright green color. Another great thing about mulch is that it simply makes things look neat and orderly.

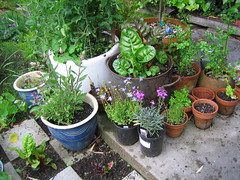
Pot Garden
Pot Garden (Photo credit: Earthworm)
3. Fill in the gaps. While you are in the process of plucking leaves, weeds, and dead flowers from your  garden it is quite likely that a few gaps will be created. Fill them in other greenery, small shrubs (evergreens are a good idea in this situation), potted plants, or nice garden art. The effects are often stunning and you have the look of an almost new summer garden for only half the effort and expense of creating one. You may also want to scour the local plant stores for late season offerings and markdowns. These are often well cared for and in good condition to add a little touch of color or green to your garden.

4. Another oft-overlooked way to keep your summer garden green is to plant plants that are appropriate to your climate. On an ordinary summer, excluding drought or excessive rain conditions, this will be the best way to achieve maximum greenness from your garden. This is actually one of the best ways to prolong the life of your garden as well because the plants being used are accustomed to the weather patterns that exist in your locale. For this reason they will be much better suited to stay green and healthy much longer than most implants that are not accustomed to the local weather patterns. It truly is sustainable gardening!

Creating a greener garden is a worthy cause for most gardeners. We plant our summer gardens because we want to enjoy them. By keeping them green, healthy, and vibrant a little bit longer we are able to prolong our enjoyment of our gardens as well as the productivity of our gardens. This means more flowers, more fruit, more vegetables, and much longer spans of greenery for the uninitiated. It's well-worth the little bit of extra time and maintenance.
Enhanced by Zemanta

Saturday, August 4, 2012

Video - Why Organic Pest Control Is the Wrong Solution

Here is a very brief but well-conceived video on why controlling pests using natural insecticides is the wrong focus. Phil Nauta, also known as "The Smiling Gardener" explains why focusing on killing bugs - even by natural means - is short-sighted and misses the root cause of the problem altogether.

Check it out, and to learn more about Phil's methods and philosophy, just click the link below the video.

Organic Pest Control - Why It's The Wrong Solution
Today I'm talking about organic pest control. The natural pest control industry for gardens is doing pretty well. That's a good thing, we don't want to be using these toxic products anymore. But there are a few issues still with this.


Click Here For More From The Smiling Gardener.... 

 
Enhanced by Zemanta

Thursday, August 2, 2012

How Natural Is Natural Insecticide? A Philosphical Debate

There have been many advances in the field of natural insecticides.  Some would say that some of the advancements are not for the better.  This is because the natural insecticide is not exactly in the state that nature gave it to us in.  So, just how natural is natural insecticide? 

Nature
Nature (Photo credit: joaoloureiro)
Sustainable gardeners who grapple with this issue are those who seek to do their part in keeping the natural world in balance.  They believe that the earth is an ecological system in which every living entity has a part to play.  They have a strict idea of what natural insecticide is. 

They don't have faith in a system where the balance is upset by one species.  They believe that man's emphasis on technological progress is damaging to the planet by its very nature.  These people are extremely uncomfortable with biotechnology and its creation of "natural insecticide" to kill off a pest species in the garden. 

Then, there are those who don't agree that there is balance or harmony in nature.  They see the world as a constantly changing system where new developments are always coming along.  Advancements in natural insecticide are only one of them.

The people who see the world as ever-changing, the naturalists, are more likely to recognize the destructiveness of nature.  They recognize that hurricanes, floods, and tornadoes, are devastating occurrences.  Famine and disease can also be caused by nature. 

For this reason, naturalists see the world as something to be explored and understood. They believe that a human being has intelligence in order to do a part in advancing the health of the planet.  Part of this is in further development of natural insecticides and other such "improvements". 

These naturalists believe that biotechnology can produce products just as natural as any other natural insecticide.  They don't see the difference in using biotechnology for agriculture and using laboratory science to make pharmaceuticals, for instance.  They see biotechnology for natural insecticide as a good thing. 

European corn borer, Ostrinia nubilalis Photo ...
European corn borer, Ostrinia nubilalis Photo by Keith Weller. (Photo credit: Wikipedia)
Naturalists are more likely to see the similarities between biotechnology and the cross-breeding of plants and animals that has been done for centuries.  We have always used this method, if not this particular technique. 

A similar issue is bioengineered crops such as Bt corn.  Bacillus thurengiensis is a natural insecticide that has been used for many years.  Now, it is being put into the genetic structure of corn.  This makes the corn resistant to insects. While those with a more sustainable view see this as messing with the natural order of things, and potentially harmful to our health, the naturalists believe that Bt corn is a normal advancement. 

What do you think? Are we just using our God-given intelligence to make the world a better place through eliminating harmful pests, or are we overstepping by presuming that "bad" bugs don't have a place in the environment?

Feel free to share your view in the comments below!
Enhanced by Zemanta