Showing posts with label vermiculture. Show all posts

Thursday, October 24, 2013

Dealing With Problems In Your Worm Farm

Worm farming is a great way to naturally compost waste and other discarded materials.  As a result, nutrient rich soil is produced and can be used in flower beds, crops, and gardens.  Regardless of all the reading and research one does, issues may arise and can cause some concern. 

Here are a few of the commonly reported questions and issues with worm farms - and how to deal with them. 

Smell

English: The inside of a worm composting bin, ...
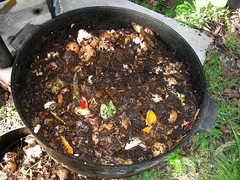
The inside of a worm composting bin, after the worms have eaten many kitchen scraps. (Photo credit: Wikipedia)
It is often thought that a smelly worm farm is normal.  In fact, it is not.  If worms are kept in an appropriate environment, they will not smell.  If the farm has an odor, the most likely cause is overfeeding. 

Material to be composted is placed on the top layer of soil for the worms to consume.  If too much is given to the worms, it can begin to rot causing a build up of bacteria within the walls of the worm farm.  This is the cause of the smell. 

To remedy the situation, simply discontinue feeding of the worms until any uneaten material is gone.  The soil should also be stirred for aeration and to allow the worms to move more freely.

Bugs and Other Pests

Using a container with a tight lid can help prevent many pests from infesting the worm farm but some are sneaky enough to make it in regardless.  Small vinegar flies are often a complaint among worm farmers.  This type of fly is of no harm to the worm farm but typically is a result of overfeeding.  Large flies appear when there is an abundance of food. 

Ants are also a common issue.  If ants are seen in the worm farm, the chances are pretty good that the soil is too dry.  Adding water to the soil to increase the moisture can help eliminate ants.  If using a worm farm that stands on legs, simply apply some petroleum jelly to the legs to prevent the ants from being able to climb up. 

Maggots can be found in worm farms where meat is offered to the worms.  The best scenario is to eliminate meat from the diet altogether.  If maggots have made their way into the worm farm, they can be eliminated by placing a milk soaked piece of bread into the farm; the maggots will be drawn to it and can simply be removed. 

Worms Leave the Farm

This topic leaves it up to the worm farmer to figure out what the problem is and fix it.  If a worm is leaving, he is unhappy with his environment and is in search of a more suitable one.  Worms will escape for reasons such as the soil being too dry or there isn't enough food.  On the other hand, soil that is too wet could also be affecting the worms, causing them to want to leave. 

Worm-farm
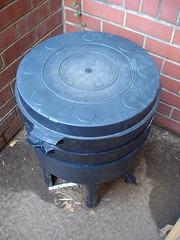
Worm-farm (Photo credit: Wikipedia)
The source of the problem should either be eliminated or fixed.  If the soil is too dry, fresh water should be added to the farm.  If it is too wet, the excess should be drained and new bedding should replace the old.  Locate the cause of the excess moisture and eliminate it. 

Ensure that the worms are getting enough food and the farm is in a location where the temperature will remain constant. 

Feeding

There may be some confusion on what to feed worms.  Appropriate foods to feed include fruits, vegetables, egg shells, greens, tea bags and coffee grounds and filters.  Non-food items can also be fed to the worms and include soaked cardboard, paper products, cotton rags, leaves, dirt and hair. 

More important are the items that should not be fed.  Dairy products, meat, citrus, onions and garden waste that has been treated with chemicals are all things to avoid in a worm farm.

These are just a few of the common topics when it comes to worm farming.  Although they are pretty easy to care for, it is important to realize the reason for some of the changes or issues noticed within the worm farm.  Problems should be corrected early to prevent the loss of the worms. 

Providing a proper environment, correct food, appropriate moisture level and temperature will help ensure a supply of happy and healthy worms.

Enhanced by Zemanta

Tuesday, October 22, 2013

Where to Find Worms for Worm Farming

Setting up a worm farm requires three things.  The first is an appropriate bin for containing the worms.  The second is plenty of compost materials to keep the worms properly fed.  We discussed both of these items last week, but of course the most important thing needed for a worm farm is, in fact, the worms. Learning where to find worms is the final step.

It is important to note that worms collected from the garden in the wild should not be used in a worm farm or you may not achieve the results you are looking for.  Various types of worms are available on the market specifically for worm farming.  These worms are sold for traits that make them more desirable for composting or as live bait. 

English: Red wiggler
Red Wiggler (Photo credit: Wikipedia)
An established worm farm can require a large number of worms to be efficient enough to compost enough material for a small family.  Most small worm farms need to start out with at least 1000 worms. 

The first place to find worms for worm farming should be the local bait and tackle stores.  These places typically sell a variety of worms that can be used for both composting and live bait.  The Red Wiggler is known as being the best worm for composting and can usually be found in establishments such as these. 

The Internet provides a mass amount of options for purchasing just about any kind of worm to use in a worm farm.  Red Wigglers, Night Crawlers, Florida Wigglers, egg capsules and even exotic breeds of worms can all be found.  A simple search on any search engine will produce a number of opportunities and choices. 

Purchasing live animals online also means that shipping is something to take into consideration.  Care has to be taken when collecting and packaging the specimens.  Most worms ship well and with ease but shipping methods should be investigated.  Simply ask the supplier what the rate of live arrival is and find out what their shipping methods are.

Local garden centers may also prove helpful as a supply for worms.  Typically they sell other supplies for worm farming as well.  Depending on the geographical location, many garden centers have a full line of the various types of worms available for purchase.  The staff is available to answer questions about worm farming for new beginners.  If a specific type of worm is found to be unavailable at a garden center, an order can often be placed for particular varieties.

English: close-up of red wiggler worm with vis...
Close-up of Red Wiggler worm. (Photo credit: Wikipedia)
A commonly overlooked option for locating worms is other worm farmers.  Worm farmers often have a surplus of worms and are more than willing to part with them.  Some are willing to offer them up for free in exchange for taking them off their hands while others will sell them for a low fee. 

Local worm farmers can often be found in the yellow pages under "worms" or "worm farms".  This provides a great source as worm farmers are often more than willing to give tips and hints for a successful farm. 

Worm farming can be fun and rewarding.  Knowing where to find good quality worms is essential in maintaining a successful farm.  Once your worm farm is established, it may one day prove to be yet another outlet and source of worms for those who are new to the worm farming world!  

Enhanced by Zemanta

Thursday, October 17, 2013

Feeding the Worms In Your Worm Farm

Naturally composting waste, providing an organic matter that enriches soil for organic and sustainable gardening, and even supplying hobbyists and fisherman with live bait.  These are all good reasons for worm farming.  Taking care of the worms in a worm farm is typically quite easy but there some guidelines to follow.  Proper feeding is important for the health of the worms, and therefore important for the health of the farm.

English: A worm composting bin. Worms are eati...
A worm composting bin. Worms are eating the newspaper bedding and producing compost. (Photo credit: Wikipedia)
Worms are fed a variety of food items, and nonfood items, for composting.  Some food type items that can be offered are fruits, vegetables, greens, bread products, cereals, tea bags, coffee grounds and filters and egg shells.  The worms will eat just about anything so it is imperative to know which foods are appropriate and why.

Fruits and vegetables are easily composted by the worms.  The important thing to remember when serving fruits and vegetables is the size of the portions.  Fruit pieces should be cut down to 1/2 inch pieces or slices.  Smaller pieces will be consumed more quickly.  Food blended up with water will also help the worms find the food and consume it faster.

Fruits and vegetables are highly nutritious.  Worms that are fed an appropriate diet will in turn produce a nutrient rich substance that is beneficial to crops, gardens, flower beds and even indoor flower pots.  Some nonfood items that can be offered to worms for composting are paper products, cotton rags, hair clippings, leaves and soaked cardboard.  A pizza box that has been torn up and soaked is a wonderful treat for worms. 

When offering leaves to a worm farm, be careful to only use products that have never been treated with chemicals.  For the safety of the worms, grass clipping and other yard clippings should be avoided unless you know chemicals have not been used. 

Dog and cat droppings can be used in a worm farm with care.  Cats and dogs that have been dewormed recently will still have the substance within their bodies.  The medicine used for deworming can be excreted in the droppings.  If fed to the worms, the droppings can kill the worms quickly.  If a pet has been dewormed recently, avoid using the droppings in the worm farm. 

Care should also be taken when offering cat droppings from a litter box.  Inorganic litters are unsafe for the worms.  If your plan is to use the worms to compost the droppings, using a natural and organic litter will keep the worms happy and healthy. 

While there are many foods that can be offered readily, there are also those that should be avoided.  Care should always be taken with items that have been treated with chemicals, medications or other substances that may prove harmful. 

English: Composting-worms just added to a fres...
Composting-worms just added to a fresh batch of garbage in a self-made worm-bin.  (Photo credit: Wikipedia)
Meats should not be offered to the worms in a worm farm.  Being voracious eaters, the worms will gladly consume whatever meat is offered.  The problem with meat is with the pests it will attract.  Flies and maggots will be found in a worm farm that uses meat and the best way to eliminate these pests is to eliminate the use of meat. Dairy products will also attract unwanted guests into the worm farm.  Another problematic issue with serving dairy products is the foul smell that is emitted as they rot.

Citrus fruits, onions and garlic should not be used either.  The worms appear to find the smell of these items offensive.  Most worms will try to escape the bin to get away from the smell. 

Feeding worms is a pretty easy job.  The key is to know which items are good and which are bad for the health of the worms.  Another point to always remember is to not over feed.  New worms should be fed in small amounts when they are becoming established within the farm.  Once settled, the amount can be increased over time.

Over feeding leads to problems such as foul smells and pests.  Keep feeding down to a minimum, offering new food only when the old food supply is running low.  Worms can eat over half their body weight in food per day.  The worm population can double every few months.  Overfeeding can cause a problem but keep an eye on the population as well to be sure that underfeeding isn't an issue.

A well fed worm population is a happy worm population.  Happy worms produce a lot of naturally composted, healthy castings for soil enrichment therefore keeping the worm farmer and gardener happy as well.

Be sure to check back next week for a few common problems with worm farming, and how to avoid them.

Enhanced by Zemanta

Tuesday, October 15, 2013

How to Build Your Own Worm Farm

So you've decided to take the plunge and set up your own worm farm.  Perhaps you're looking for a natural way for composting waste, are interested in the nutrient rich fertilizer produced by the worms for use in your sustainable garden, or are looking to provide a constant supply of live bait or live food for exotic pets.  Regardless of the reason, you're going to need to set up a bin.

Worm farm
Worm farm bin (Photo credit: davesag)
Various models are available for purchase at worm farming supply companies and garden centers.  These come in different shapes, sizes and colors and each have their own benefits.  The frugal approach is to build your own. 

The first thing to consider is how big of a container you're going to need.  To figure this out, you'll need to first measure out approximately how much waste you are going to need to use for feeding.  For each pound of waste, you'll need one square foot of space in your bin.  Depth should be at least six to twelve inches. 

A plastic tote or container works well as do wooden boxes.  Metal containers should not be used as irons and chemicals can leach into the soil, harming the worms.  Many worm farmers prefer wooden boxes over plastic as wood is more easily aerated. Plastic can cause more moisture to build up than wood, which can be both good and bad.

Once a container of the appropriate size has been chosen, it'll need to be prepared.  Holes should be drilled or punched through the top of the container to allow for air flow.  There are two ways to address the bottom of the container. 

One method is to drill or punch holes into the bottom of the container to allow excess water and other liquids to drain out.  Another is to install a spout at the bottom of the container.  When liquid begins to fill up in the bottom, the spout is turned on and releases the fluid. 

If using a spout, a raised shelf should be added within the container.  This shelf should be the same width as the container, but be allowed to sit a few inches above the bottom.   This will allow the empty space at the bottom to fill with liquid and prevent it from sitting in the soil and bedding.  This raised shelf should be made of slats or have several holes to allow liquids to drain into the bottom of the container.

If a raised shelf is not used, screening should be installed over the holes to allow liquid to run out of the container but prevent worms from squeezing through.  Screening should also be attached to the top of the container to prevent escape. 

The new top layer of the Reln worm farm
Top layer of a worm farm (Photo credit: Doug Beckers)
Some thought should be put into what will be used for bedding material.  Soaked and shredded newspapers, cardboard and even dampened leaves can be layered in the bin.  Regardless of the material used for bedding, a small amount of soil should always be mixed in. If using the raised shelf system, bedding should be layered on top of the shelf.

The container should be put in a location that will ensure optimal conditions. Temperature should remain between 72 and 75 degrees Fahrenheit.  The bin should not be placed in an area of the yard that will gain excess rain water, either. 

Once the bin has been constructed, bedding has been added and the perfect location has been found, the next step is to add the worms and begin your own worm farm.  Worm farming is rewarding whether it is done for a profit or a hobby.  Constructing an appropriate home for these guys is your first step towards becoming an authentic worm farmer.

For what to feed your worms, be sure to check back on Thursday!

Worm Farming Resources:
     
Enhanced by Zemanta

Saturday, September 1, 2012

Video - Setting Up Your Worm Composting System

This quick video shows how to create and set up your own worm composting system, if you don't want to buy one. They are generally very cheap and easy to make, and require just a few supplies. Learn how many air and drainage holes to drill, and what size drill bit to use. He also tells you what materials to feed your worms, and which ones to avoid, how to set up the bedding, why you need to add some dirt, and more.

If you're starting your own vermiposting system, this video will be very helpful.

Setting Up a Worm Composting Bin
Detailed instructions for setting up a 'deluxe' Rubbermaid worm composting bin


If You'd Rather Not Create Your Own Bin.... 
   
Enhanced by Zemanta

Tuesday, August 28, 2012

The Basics of Vermiculture (Worm Composting)

If you're an organic gardener, you're probably quite familiar with composting. But you may not have heard as much about vermiculture. What is vermiculture?  It is quite simply, composting with worms.  Composting is the practice of breaking down organic matter to create natural fertilizer.  It’s great for gardening and a very sustainable practice.  Vermiculture facilitates the composting using the natural decomposition abilities of worms.  It uses a worm’s natural abilities to make great fertilizer out of organic waste.

English: Composting-worms just added to a fres...
Composting-worms just added to a fresh batch of garbage in a self-made worm-bin. (Photo credit: Wikipedia)
What Types of Worms Can Be Used in Vermiculture

Not all worms are good for a home composting set-up.  In fact, some types of worms can't be used for any type of composting system.  However, a handful of worm varieties do make great organic composting partners.  They include:

* Red wigglers
* European night crawlers
* Belgian night crawlers
* Blueworms

Of all of these types of earthworms, the red wigglers are the most common worms used in vermiculture.  All worm types can be found in your local nursery, live bait shop, and of course ordered online - because who doesn’t want to receive a box of worms in their mailbox!  :-)

What Do Worms Eat?

Not everything can be composted.  However, vermiculture does lend itself to more options than standard composting.  Worms can eat:

* Fruit and their peels
* Vegetables and their peels
* Pulverized egg shells
* Tea bags
* Coffee grounds

They can also eat meat and dairy products, oily foods, and grains.  However, these items tend to smell something awful and most people don’t recommend composting them.

Materials To Compost With Worms At Home
English: The inside of a worm composting bin, ...
The inside of a worm composting bin, after the worms have eaten many kitchen scraps. Note the castings on the sides of the bin. (Photo credit: Wikipedia)
It’s actually very easy to set up a worm composting system in your home.  To get started you’ll need:

* A bin – a wash bin or commercial worm bin are both great options.  It doesn’t need to be deep because the worms like to hang out near the surface.  If you’re using a wash bin, you’ll want to drill holes in the bottom for drainage.  You’ll also want a cover for your bin.

* Bedding – newspaper works the best because it’s easy to access.  Shred it and dampen it before placing it in your bin.  Add a few handfuls of soil and you’re ready to add the wigglers.

* Worms

* Food to compost – the ratio is one pound of food waste per day to two pounds of worms.  If you have fewer worms, reduce the food waste accordingly.

Place your worm bin in a room with moderate temperatures that is easy enough to access.  Options might include your kitchen, basement, outside the back door or in your laundry room.  When your compost is ready, it will resemble a dark, rich soil.  You can use it in your garden or place around houseplants. 

Be sure to check back Thursday when we will share some tips for making sure your worm composting venture is a success!  Or check out the very helpful book Worms Eat My Garbage: How to Set Up and Maintain a Worm Composting System.


Enhanced by Zemanta