Showing posts with label Sowing. Show all posts

Wednesday, July 30, 2014

Succession Planting - Grow More Vegetables in Less Space

If you have a small amount of space to plant a vegetable garden, you are probably eager to get the most out of it. Succession planting is a great way to accomplish this. This practice involves growing the same or complementary crops in the same spot continuously throughout the season in order to maximize the yield a garden can produce. In other words, succession planting combines the efficient use of space and timing to obtain better results. 

Gelbe RĂ¼ben und Zwiebeln in Mischkultur; Compa...
Companion planting of carrots and onions (Photo credit: Wikipedia)
Many novice gardeners mistakenly believe that planting and sowing seeds is a one-and-done process that only happens at the beginning of the growing season. So, they head out to the garden each spring, get some plants and seeds in the ground… and wait for the magic to happen.

Unfortunately, following this one-off approach to planting is almost guaranteed to cause many peaks and valleys in what can be harvested throughout the season. If you want your garden to produce an abundant supply of fresh produce all season long, you need to plan ahead for it.

Plan Ahead for Successful Succession Planting 

To create a successful succession-planting plan for your garden, you need to take a number of variables into account. For example, you’ll want to consider how long each crop takes to reach maturity, how long it produces once mature, and which crops can be harmoniously planted in the same space at different times throughout the season.

Although the number of variables involved in succession planting may seem a little intimidating at first, don’t let that discourage you. It may take some practice, but you can definitely get the hang of it. If you are just starting out, choose only one or two beds or containers to practice in your first year. Also, take detailed notes in your garden journal throughout the growing season so you know what worked - and what didn’t - when next season rolls around.

Getting Started with Succession Planting

Before you start digging in the dirt, you’ll want to have a good idea of what you plan to grow. Start by making a list of which plants you want to grow in your succession planting area. As you are compiling this list, make sure you note the correct variety of each plant, because there is a lot of diversity among different varieties of the same plant species.

Then, next to each plant variety on your list, note how long that particular plant takes to reach maturity, is it heat or cold tolerant, how many hours of sunlight it needs each day, what type of soil it prefers, and its spacing requirements. The back of seed packets and garden catalogs are great starting points for this exercise.

Aeroponics-companion-plantings
(Photo credit: Wikipedia)
Once you know what you’d like to grow in your selected space, decide if you want to focus on growing the same crop throughout the season or if you want to try inter-planting more than one variety. Lettuce and herbs like basil and cilantro are great for repeated sowing all season long. However, if you want to try more than one crop, try to find a couple of recommended companion plants for your favorite choices.

If you need more information on companion planting, there are tons of great resources and books available on this topic.  The best ones provide a lot of great information to help in your planning process.  Online resources are nice, but it’s always good to have a hard copy on hand for future reference. (Click the "companion planting" tag below this post for more articles on this topic - and check out the suggestions below for some hard-copy resources.)

Although succession planting may seem complicated at first, you’ll be amazed at how quickly you can make it work for you. By applying the principles of succession planting to your own backyard garden, you’ll soon be growing more fresh fruits, vegetables and herbs throughout the season than you ever thought possible.

Recommended Resources for Succession & Companion Planting:
   

Wednesday, May 21, 2014

How to Decide When to Plant Vegetables in Your Area

Figuring out when to plant vegetables in your area requires a little detective work. In addition to your geographic location, you’ll need to consider a few other variables, as well. For example, the type of vegetables you plan to grow and how you intend to plant them (seedlings, transplants or seeds) will factor into when you should get your crops in the ground, as well.

If you live in an area with distinct seasons, your vegetable growing season will fall loosely between your anticipated frost-free date in the spring and the first hard frost in the fall. Unless you have a crystal ball, it is next to impossible to predict these dates with absolute certainty. 

Fortunately, there are some valuable online resources you can check for general guidelines. A quick online search for “frost-free date” + your geographic area should give you a good idea of when it might be safe to plant in your region.

A tray used in horticulture (for sowing and ta...
Starting seeds indoors for an earlier start. (Photo credit: Wikipedia)
Of course, the published frost-free date for your area doesn’t take into account unexpected late season snow storms or unseasonably cold temperatures. However, if you wait until after the expected frost-free date for your area AND for the daytime soil temperature to reach 65 degrees or warmer, you should be in good shape. If you want to warm up your soil faster, you can cover your planting beds with dark plastic sheets for several weeks prior to planting.

As you develop your garden planting timeline, think of these two important dates as virtual “bookends” around your prime vegetable growing season. However, if you start seeds indoors or protect your plants from cold temperatures with mulch, cold frames, row covers or mini-hoop houses, you can extend your growing season even further. 

Don’t Ignore “Days to Maturity” for Your Selected Plants

As you’re deciding when to plant vegetables in your garden, pay close attention the “days to maturity” information noted on the seed packages or plant markers for the vegetables you’ve selected. This number, which is often expressed as a range of days, tells you how long it will take until that plant is ready to harvest.

Lettuce in raised beds with hoops
Lettuce in raised beds with hoops (Photo credit: Gardening in a Minute)
This is important to know because some vegetables reach maturity much faster than others. For example, radishes, lettuce and baby carrots may be ready for harvest just 30 days after they are sown as seeds. On the other hand, some pumpkin varieties can take a full 120 – 160 days before they reach maturity. 

The “days to maturity” for a particular vegetable variety gives you an idea of how early you need to get that plant into the ground if you want it to reach maturity before your first hard frost date. 

It also tells you how late in the season you can plant certain crops. For example, you can’t wait until late summer in northern climates to plant pumpkins seeds that require 160 days to mature. On the other hand, you can plant fast-growing lettuce varieties with confidence until 30 days or so before your expected last frost date.  

Learning when to plant vegetables in your area is worth the effort. Knowing when your prime growing season begins and ends – and how you can get the most out of it – will make you a much more successful food gardener. It will help you decide which vegetables to grow and how to help those varieties thrive in your garden.

We will be on vacation next week, so will not be posting, but be sure to check back the following week when we'll share 3 important tips that vegetable gardeners need to keep in mind for a successful organic gardening experience!  Have a Happy Memorial Day, and enjoy your beautiful early summer garden!

Enhanced by Zemanta

Wednesday, May 7, 2014

Planting A Wildflower Garden: Part 1 - Preparing Your Spot

A wild-flower garden has a most attractive sound. One thinks of long tramps in the woods, collecting material, and then of the fun in fixing up a real wild garden.

Many people say they have no luck at all with such a garden. However, it is not a question of luck, but a question of understanding, for wild flowers are like people and each has its personality. What a plant has been accustomed to in nature it desires always. In fact, when removed from its own sort of living conditions, it sickens and dies. That is enough to tell us that we should copy Nature herself.

When you are hunting wild flowers, as you choose certain flowers from the woods, notice the soil they are in, the place, conditions, the surroundings, and the neighbours.

Lacy Phacelia (Phacelia tanacetifolia) - geogr...
Wildflowers. (Photo credit: Wikipedia)
Suppose you find dog-tooth violets and wind-flowers growing near together. Then place them so in your own new garden. Suppose you find a certain violet enjoying an open area - then it should have the same in your garden. If you wish wild flowers to grow in a tame garden, you must make them feel at home - and that means you need to trick them into almost believing that they are still in their native haunts.

Wild flowers ought to be transplanted after blossoming is over. Take a trowel and a basket into the woods with you. As you take up a few, a columbine, or a hepatica, be sure to take with the roots some of the plant's own soil, which must be packed about it when replanted.

The bed into which these plants are to go should be prepared carefully before you obtain your plants. It is not a good idea to bring those plants back and let them sit over a day or night before planting. They should go into their new quarters at once. The bed needs soil from the woods, deep and rich and full of leaf mold. The drainage system should be excellent. Some people think that all wood plants should have a soil saturated with water. But the woods themselves are not water-logged. If you have heavy, wet soil, you may need to put in some extra work, and dig your garden up very deeply and put some stone in the bottom. Then replace the soil. And on top, where the top soil once was, put a new layer of the rich soil you brought from the woods.

Before planting, water the soil well. Then as you make places for the plants, put into each hole some of the soil which belongs to the plant which is to be put there.

Once your bed is prepared, you are ready to collect plants to fill it, and build your beautiful new wildflower garden!

Be sure to check back next week when we will share some ideas and suggestions for what flowers to plant, and how to choose the right ones for your wildflower garden.


Enhanced by Zemanta

Wednesday, March 19, 2014

Time To Plan Your 2014 Garden!

It may still feel like winter all too often around here, but the days are getting longer, the sun is getting brighter, and spring "officially" starts this week! So what are you growing this year?

It's time to get planning - and in some areas - planting! Starting seeds indoors can be a great way to kickstart your garden in colder climates. Typically you want to start seeds about 6 weeks before planting out, which means mid-to-late March here in Ohio. Now is the time!

Growing radish plants
Growing radish plants (Photo credit: Wikipedia)
Garden plants which typically do well when started indoors include tomatoes, peppers, broccoli and other cruciferous vegetables, lettuce, and some flowers. Things you will want to wait and direct-seed when it warms up a bit include peas, beans, and corn. Things that you may be able to direct-seed outdoors right now or within the next couple of weeks (depending on your location) are potatoes, radishes, and some lettuces or salad greens.

I, myself, am in a bit of a quandary this year, as my fiance and I are planning on moving to a new house in the summer, so I don't want to start a big garden and have to leave it behind! By the time we move, it may be too late to start much of a garden at the new place, and I'm not sure I can make it through the summer without ANY gardening!  So I will likely have to grow some short, cool-weather crops this spring, and make do with that. I have been over-ambitious and purchased tons of seeds (hoping to be in the new house by garden season), but I do have radish seeds, salad mix, and some flowers that I can probably plant here in the next few weeks. Radishes are a springtime favorite of mine, and I'm not sure why I don't grow them that often! They are amazing in salads, and add a zesty crunch to sandwiches. I know you can also pickle them, but I've never tried that.... Perhaps if I get a big crop....

It's 50 degrees today, and my green thumb is itching! What about you?

Spring Gardening/Seed Starting Supplies:
     
Enhanced by Zemanta

Thursday, April 4, 2013

Video - Starting Your Vegetable Seeds Indoors

This short video gives some pointers for giving your vegetable garden a head start - by starting your seeds indoors ahead of time. Most seeds should be started 4-6 weeks ahead of the last frost date, so they have time to get a good root system established before transplanting. However, some may take less time, so be sure to check the instructions on your seed packets before planting. If you plant too soon, your plants can get too "leggy" and die, or not transplant well. His tip about the rolling racks is a great one - this way you can roll them outside if you like when it gets warm enough during the day, and easily bring them back in at night.

Check it out, and get your garden started early this year!

How to Start your vegetable seeds indoors Part 1 of 2
Vegetable Garden How to start your vegetable seeds / plants indoors to beat the weather and save money. Visit The Bayou Gardener at http://www.thebayougarden...


Helpful Seed Starting Resources:
   
Enhanced by Zemanta

Tuesday, March 19, 2013

Garden Planning: Choosing A Theme for Your Garden

When planning your garden, it is often good to have a theme that you can follow throughout your garden,  and a selection of plants that will go along with that theme.

By having a theme to follow this will dictate, not only the types of plants that you will be buying, but also anything else that you put in the garden. This will include everything from sculptures and garden furniture, to the colors of the pots that you will choose.

While some people might think this is restricting their freedom of creation, it does in fact allow you to create a garden that has more freedom of flow rather than being disjointed with a variety of different themes that never quite gel together.

Kerascoët, (Névez)
Cottage garden. (Photo credit: Wikipedia)
Sometimes the theme of your garden will be determined by the style of the house that you have on the property, and other times it will be determined by the geographical location where you live.

If for instance you are living near a beach, you might want the theme to tie in with the beach setting. By doing this you are likely to get plants for your garden that are more appropriate and will endure the conditions that they will be growing in. Plants that are suitable for growing in coastal areas will be able to withstand the winds and the salt of the sea air that could quickly damage other plants that aren't suitable for those conditions.

Likewise it wouldn't look quite as appropriate to have a tropical garden with palms where a cottage garden would compliment the style of the house.

And tropical plants are not going to flourish as well in cold harsh climates so there are many factors that need to be taken into account when deciding on your garden theme.

But overall, a well-planned theme can ensure you have a healthy and beautiful garden that is both thriving and enjoyable to work and play in, and expresses your own unique sense of style.

Enhanced by Zemanta

Tuesday, February 5, 2013

Using An Organic Vegetable Garden Planner

As we touched on briefly last week, It's a great idea to use a vegetable garden planner before you go ahead with planting. Many people allow their garden to grow in a very random manner, just putting plants wherever there is a little bit of space without thinking about how the finished garden will look. Sometimes this works out well but more often, it is a mess.

The first thing that you should do when you are working with a vegetable garden planner is to think about the site that you have. Ideally, your vegetable plot will be in a place that receives natural sunlight. It doesn't have to get the sun all day, but a completely shaded, north-facing area is not the best place for your vegetables. In fact you will find it difficult to make anything grow in an area that gets no sun at all.

English: vegetable garden, detail Français : j...
 (Photo credit: Wikipedia)
Planting close to the house is a good idea. Many people put their vegetable garden away out of sight because they do not consider vegetables to be as attractive as flowers. This is understandable, but it is important that you can see your growing crops, otherwise you are much more likely to forget about them - and you can really get a lot of enjoyment out of surveying your growing crops. Some people believe that plants benefit from being noticed, cared about and talked to, and if this is true, then they need to be visited often!

There are a couple of things that you can do to keep your vegetables close to the house while having an attractive view from your windows. One is that you put the vegetable garden near to a door, but not right under the windows of your main rooms. Maybe you could look out onto it from the kitchen window, for example.

Another possibility is to plant flowers in among your food plants. This is a great idea anyway, since it brightens up the area that you will be working on. And some flowering plants, like marigolds, are often placed among vegetable crops in an organic garden because they have the advantage of repelling pests.

An organic vegetable garden planner will often recommend that you protect your plot with a rabbit proof fence. This is important if your garden is accessible to rabbits, foxes, dogs or other animals that might either eat your plants or dig in your beds.

English: An apartment building with a small fl...
(Photo credit: Wikipedia)
When you have prepared the site for your organic vegetable garden, it is time to think about what to plant. You will want a variety of crops, not too much of the same thing. The main question is what you like to eat, but it is also important to make sure that you will have a constant harvest through the year. If everything that you plant is going to be ready in August or September, and nothing the rest of the year, you have not used your vegetable garden planner very well!

On the other hand, when you have decided on plants that can be harvested in a certain season, it's a good idea to put them together. That way, when the season is over, you can clear a whole area and prepare it for another planting. If your plants are all mixed together, it will be more difficult to do this.

And don't forget to rotate your crops, as we discussed last week. This helps to stop pests and disease from establishing themselves, and circulates nutrients in the soil. Again, this is easier if you have used a vegetable garden planner to have all plants in a certain area produce their harvest at the same time.


Vegetable Garden Planners: 
   
Enhanced by Zemanta

Thursday, August 23, 2012

Planting in Fall For A Spring Garden

You might think of the autumn simply as the time to clean up, removing the previous summer's growth from your garden. There might still be some specialized flowers and vegetables growing through the fall, but the emphasis at this time of year is to wind things down, and wait for the spring to do all the new planting. Yet, for some plants, the best time to be put in the garden turns out not to be the spring at all.

An autumn ground with fallen leaves and grass ...
An autumn ground with fallen leaves and grass (Photo credit: Wikipedia)
Some plants, in fact, do much better if they are planted in the autumn rather than in the following spring. That doesn't mean they bloom and grow all winter; they'll lie dormant like many other plants through this period. However, planting in the fall and letting them start their growing season gradually as things warm up in spring works better for some plants.

Most perennials actually thrive by this process, because the soil is still relatively warm and moist from the summer, and they have time to become properly rooted throughout the autumn. If they're planted in the spring, on the other hand, the soil is still quite cool, and the plants face a few months of trying to root properly even while the above-ground temperatures are inducing them to produce leaves and flowers. An especially hot summer can place additional stress on these new plants, and particularly for some fruit-bearing bushes and trees, can even kill them. Perennials planted in the fall have a much better chance of being established and attaining their full size and growth the following summer, than do similar plants that are planted in spring.

There are a number of shrubs and trees that establish themselves better if you plant them in the autumn. Your garden center or some research on gardening websites can help you discover which other plants thrive best if put into your garden at this time of year. However, some plants that you might consider could be Siberian or bearded irises, lilies, peonies, hostas, pinks, hens and chicks, or phlox. Trees or bushes like hawthorn, maple, crab apple, pine, linden, and elm should also be planted in the fall rather than the spring.

Another thing people don't always think of in the autumn is planting seeds rather than the plants themselves. When you think of it, nature's way generally tends to be for seeds to drop and be spread in the fall, and get covered over and lie dormant through the winter, in preparation for germinating the following spring. Some actually require a spell in cold temperatures before they'll sprout. So in your own garden, too, you can plant certain seeds that will then wait through the winter and begin to grow the following spring. Try this with some of your perennials, and you can even give it a go with annuals that are described as "hardy annuals." This will also work with some self-seeding herbs and flowers, such as cilantro, Four O'Clocks, and datura ("moon flowers"). For me, I can never seem to get cilantro to grow well if I plant it in the spring or summer - it always bolts too quickly and hardly makes any leaves. If I plant it in the fall (or it seeds itself), it comes up by itself in the spring and grows large and lush before it gets too hot.

Garden with some tulips and narcissus
Tulips and narcissus flowers in spring (Photo credit: Wikipedia)
Of course the one fall planting that everyone is familiar with is the bulbs. Tulips and daffodils, snowdrops and crocuses - all of these should be planted in the autumn before the soil freezes, at least six weeks earlier or slightly more. You might already have been doing this, but now you know that your repertoire for fall planting can be considerably wider. If you plant what you can in the autumn, you will probably end up with a thriving, growing garden much sooner the following spring than you've had before. Plus you don't have to stop gardening yet! :-)

Enhanced by Zemanta

Tuesday, August 21, 2012

A Few Tips On What to Plant In A Fall Garden

Well, I spotted a few yellow leaves this week.... Sad as it may be, it seems this summer is already drawing to a close (wow - that was fast!). But that doesn't mean gardening is already over! As autumn arrives and you look out the window into the yard, you may be thinking that that's pretty much it for your garden. All the vegetables have been harvested, the annuals have run their course, and it's time to wind things up. Dig up and toss the annuals, prepare the soil and some of the plants for next year, and then leave the garden alone for the next several months. All done.

Fall Planting in Progress (Photo credit: EatandLiveGreen)
However, that isn't necessarily the case. Your garden may, in fact, be far from done, and you can give it life for a few more weeks. It may come as a surprise, especially if you're a novice gardener, but there are actually some things you can plant in the autumn rather than in the spring, and some things that might even keep growing through the first frosts. Far from winding down all your garden activities, you can still be out there, planting, watering, and pruning to your heart's content.

Some flowers, like pansies, for example, actually prefer cooler weather. So in a way, you can bracket your entire growing year with pansies and the related violas, starting them early in the cool spring, and then planting more in the cool autumn. Certain types of impatiens plants also seem to do quite well as the hot summer gives way to cooler autumn temperatures. It's long been known, too, that ornamental (and edible!) kales and cabbages last long into the autumn, and mums are another very hardy flowering plant that you can use to brighten up the garden.

Root Vegetables
Root Vegetables (Photo credit: frank3.0)
Certain vegetables can also still be growing in the autumn, though they would have been planted a bit earlier in the season. In Zone 5 and further south, for example, you can plant root vegetables in August, to bring in a harvest before the first frost. This would include things like beets and turnips, and possibly green onions and shallots as well. So you can extend your harvest into the fall, even if you planted earlier than that.

You can also check for seed packets in early August, looking for vegetables that can be planted even later. You can ask the advice of the local garden center to be sure which ones work best for your Zone, but look for the ones that list the shortest growing season on the packet. For these vegetables, you would prepare the garden beds all over again, removing all dead and finished vegetation and spreading fresh mulch and compost so that some nutrients are restored to the soil. Some vegetables (including root vegetables like beets and carrots, and leafy greens like lettuce, mustard, collards, and kale) can even grow through the first early frosts and yield a harvest for you - some will even taste sweeter, as the cool weather brings out the sugars in the plants.

As you put some parts of your garden to bed for the autumn and winter, other parts can still be vital and growing, while still others can be planted afresh and begin a new growing season entirely. If you enjoy your gardening and really don't want to let it go yet, there are ways to extend the pleasure just a little longer. Bring in some mums and pansies and plant some root vegetables and greens, and let the gardening continue for several more weeks - or maybe even months!  (And if you want to try gardening year-round - which I am trying this year for the first time myself - see Eliot Coleman's excellent book, The Four-Season Harvest.)

 
Enhanced by Zemanta

Thursday, March 15, 2012

Starting Seeds Indoors - Part 2

Continuing from Tuesday's post, here are some tips for planting your indoor seeds, thinning, watering, and getting them growing well in preparation for moving them outdoors later in the spring.

Planting Seeds:

Sunflower seedlings, just three days after ger...Image via WikipediaAfter your heat-treated soil has cooled, fill planting containers firmly but do not pack. Allow about 3/4-inch from the soil surface to the rim of the container. Water well and let drain for several hours. Place seeds on the soil surface. Use a piece of window screen or old flour sifter to sift soil over the seeds to the depth indicated on the seed packet.

If you use compartmentalized trays or individual peat pots, place two or three seeds in each pot. Do not cover too deeply, as this may reduce or prevent seed germination. Just like planting directly in the ground, a general rule is to cover no more than four times the diameter of the seed.

Apply a fine spray of water to avoid washing the seed out, causing them to float to the soil surface. Household window sprayers are suitable.

Cover the containers with plastic sheets or panes of glass and place in a cool room (60 to 65 degrees) away from direct sunlight until germination. By doing this, you will almost eliminate the necessity of watering the bed again before the seeds germinate. Be sure to keep an eye on it though. DON'T let it completely dry out, and be sure to keep checking for seedlings, as they will need light once they appear.

Germination can take anywhere from a few days to a couple of months, depending on what you are growing, so patience will have to be one of your virtues.

When seeds germinate, move them gradually (over two or three days) into brighter light. When the seedlings have developed the first true leaves (the leaves above the cotyledons or “seed leaves”), thin to one plant per container if using partitioned trays or peat pots. Use tweezers to pinch off unwanted seedlings rather than pulling them, to avoid disturbing the remaining seedling.

If seeds were planted in larger containers, transplant into individual peat pots or other small containers. An alternative is to thin the seedlings so they are spread about 1 1/2 to 2 inches apart and leave them in the larger containers. This method, however, makes inefficient use of seed and space.

Water your seedlings carefully. Small containers used for starting plants dry out quickly. On the other hand, soil kept soaking wet inhibits seedling growth and may kill the plants.

SeedlingSeedling (Photo credit: arimoore)Moving Seedlings Outdoors:

About one week prior to planting-out time, gradually expose seedlings to longer periods outdoors unless temperatures are below 50 degrees. At the same time, reduce watering to a minimum as long as plants do not wilt. This will help the plants adjust to full exposure without undergoing undue shock at planting time.

When it comes time for planting in the ground, carefully remove the plant from its container, keeping the roots intact. Dig a small hole in the garden plot and place the plant into the hole. Cover up the roots completely nearly up to the bottom leaves of the plant. Pack down the soil around the plant and water. Watch your garden grow!


Seed Starting Supplies:
   

Enhanced by Zemanta

Tuesday, March 13, 2012

Starting Seeds Indoors - Part 1

Well, it's about that time!  For many, March is the start of gardening season, as in most areas it means it's time to start seeds indoors for your spring and summer garden.

English: Tomato plants sprouted from seeds. Se...Image via WikipediaStarting your seeds indoors will lessen the amount of time you have to wait to see results in your garden, and many people prefer to grow their plants indoors first to ready them for the growing season. It can also be motivational and satisfying to see those little sprouts all bright and green in your window, after a long cold winter!

If space is available near a sunny window, start seeds four to eight weeks before the plant-out date in your area (average date of last killing frost). I know it's tempting, but starting too early can result in spindly plants due to crowding and lack of sufficient light.

Planting Containers:

Almost any container with drainage holes in the bottom will work for planting. You can recycle and use paper milk cartons cut in half, Styrofoam cups, small baskets, tin cans, or reusable plastic trays or pots. For convenience, however, you may wish to start plants in the plastic trays and pots available at garden supply centers. Peat pellets can also work well.

English: Flowerpot with potting soilImage via WikipediaPotting Soil:

Use a rich, well-drained soil. Potting soils made for African violets and other house plants usually are suitable and do not have weed seeds. They are, however, more expensive than soil mixes you can make at home. If you use soil from the yard, it should be top soil that is well drained and not high in clay.

The best soils are often found around established shrubs and trees. Add sphagnum peat and sharp sand to the soil in a ratio of about one-half volume of each, and mixed thoroughly.

To kill weed seeds and some damaging soil fungi present in your commercial soil, place the soil mix in shallow trays or baking pans in an oven for 45 minutes at 250 degrees. For best results, the soil should be moist.

Be sure to check back Thursday, when we'll cover tips for planting and germinating your seeds for best results, and transitioning them to your outdoors garden!


Seed Starting Supplies:
   

Enhanced by Zemanta

Thursday, March 1, 2012

Getting Started With Gardening - Part 2

Continuing on from Tuesday's post, here are some more considerations for starting your new garden.

Cover of Colour Dictionary of Garden PlantsImage via WikipediaIf you buy seeds then plant them according to the directions. If picking plants, choose ones with green, healthy looking leaves and stems and healthy roots.  Put the smaller plants towards the front of the bed and larger ones in the back.  The key to a successful beginning in gardening is planting at the right time.  Make sure and wait until the frosts are over before planting.  If you are planting seeds the package will usually tell you exactly when you can plant them to achieve maximum growth.

Once you have started and gotten into gardening, making sure your plants receive enough water is essential to their growth.  Hand watering works well if you only have a few plants.  Other options include sprinklers or sprinkler hoses.  Watering is more effective during the cooler parts of the day.  The type of plant will depend on how much water is needed, but most require about an inch per week.  During the hottest periods plants will be need watering about three times per week.

One of the most helpful things to add to a garden is mulch or compost.  Just a few inches of organic mulch will improve fertility and help the soil hold moisture.  Wood chips, grass clippings, leaves, manure, and pine needles are all things that can be used as mulch. 

If you are just getting started with gardening, these tips should get you off to a good start!

More Beginner's Gardening Resources:


Enhanced by Zemanta

Saturday, January 7, 2012

Video - Starting Plants in Homemade Bio-Domes

Here is a pretty cool video which demonstrates step-by-step how to build a biodome (which requires no further maintenance) to start seeds. This will help your plants get a good head-start for planting out later, or in some cases you may actually be able to keep the plant in here, but it depends on the type of plant you are trying to grow (for instance, tomatoes will need more space and soil to produce fruit), but it's still a great way to start plants and get them going good before planting them outside. And hey, it's also recycling! :-)

Enjoy the video, and check out the link below as well, for an update on the seeds she planted here - and of course let us know if you try this, and what you think!:

Growing Veggies indoors. 2 Liter Bio-Dome Organic Gardening
Im really interrested in some feedback if anyone tries this. Let me know if I didnt cover something and you have a question. I will post an update on the broccoli after it comes up a bit. :)


Update Video on her Biodome Garden: http://www.youtube.com/watch?v=7PglxavZifQ&feature=mfu_in_order&list=UL
Enhanced by Zemanta

Saturday, October 1, 2011

Video - How to Grow Garlic

Garlic is just about as universal an "herb" as you can get. Used in cuisine from Mexican to Thai, and of course let's not forget - Italian - garlic is pretty much an necessity in any cook's kitchen. However, many people don't think of growing garlic in the garden, even though it is quite easy. Even I - Italian that I am - am somewhat embarrassed to admit I've never tried it, but I will now!

This short video shows you how to do it - yes, it really is that simple!  I am planting some this fall, and will post pictures of the results in next summer's blog.  (Note: After a few seconds, you can click "Skip" to get past the commercial, which is quite long.)

Growing Herbs : How to Grow Garlic
When growing garlic, the best time to put out the plant is in the fall, and it should be planted like any other bulb. Grow garlic by planting them two to three inches deep with tips from an experienced gardener in this free video on gardening and gro...

Enhanced by Zemanta

Thursday, April 28, 2011

Spring Vegetable Garden Series - Beans Through Cabbage

Today we get into some of the good stuff - individual vegetables, and their care and cultivation. Read on for some good tips, as well as ideas for veggies that you may not have thought to grow before, but which may make a nice addition to your spring garden.

Beans:
List of vegetables in AssamImage via Wikipedia
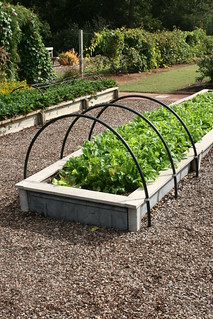
These days, most people choose to grow bush beans rather than pole beans, and I'm not quite sure why, unless it is just a question of convenience. In a city backyard the tall varieties might perhaps be a problem since it would be difficult to get poles. But these running beans can be trained along old fences and with little urging will run up the stalks of the tallest sunflowers. So that settles the pole problem. There can definitely be an ornamental use for pole beans. Try planting them at the extreme rear end of each vegetable row. Make arches with supple tree limbs, binding them over to form the arch. Train the beans over these. When one stands facing the garden, what a beautiful terminus these bean arches make! And the beans themselves will then be easy to pick without a lot of bending over, so pole beans may be a good choice for those with bad backs, knees, or those with low flexibility.

Beans like rich, warm, sandy soil. In order to prepare the soil be sure to dig deeply, and work it over thoroughly for bean culture. Beans don't do well in cool soil, you will will want to wait until things have warmed up a bit, and the spring chill is gone. A little lime worked in with the soil is also helpful in the cultivation of beans.

Bush beans are planted in drills about eighteen inches apart, while the pole-bean rows should be three feet apart. The drills for the bush limas should be further apart than those for the other dwarf beans -- say about three feet. This amount of space gives opportunity for cultivation with the hoe. If runner (pole) beans start to climb too high, just pinch off the growing end, and this will hold back the upward growth.

Among bush beans are the dwarf, snap or string beans, the wax beans, and the bush limas, one variety of which is known as brittle beans. Among the pole beans are the pole limas, wax and scarlet runner. The scarlet runner is great for decorative effect. The flowers are scarlet and look just beautiful against an old fence. These are also quite lovely in the flower garden. If you are in need of a vine for your garden, this is a great choice, for one gets both a vegetable, bright flowers and a screen - all from the one plant. When sowing beans, put the bean in the soil edgewise with the eye down.

Beets:
Beets like rich, sandy loam, also. Fresh manure worked into the soil is fatal for beets, as it is for several other crops as well. But suppose that the only organic fertilizer you have available is fresh manure? Some gardeners say to work this into A selection of Beta vulgaris, known as beet ro...Image via Wikipediathe soil with great care and thoroughness. But even so, there is the danger of some of the tender beet roots being exposed to it. Here is a possible solution:  Dig a trench about a foot deep, spread a thin layer of manure in the bottom, fill in the trench with soil, and plant above this. By the time the main root strikes down to the manure layer, there will be little harm done, as the root will be large and tough enough by then, to survive just fine. Beets should not be transplanted, so you will need to direct-sow them. If the rows are one foot apart there is ample space for cultivation. Whenever the weather is really settled, and you aren't in danger of a hard-freeze, then these seeds may be planted. (Beets also make a great fall crop, if planted in late summer.) Young beet tops make fine greens, and the beet roots themselves are delicious and healthy whether steamed, sauteed, pickled, or boiled and sliced on salads. 

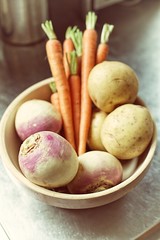
There are other big coarse members of the beet and cabbage families called the mangel wurzel and ruta baga. Sometimes these are raised to feed to cattle. They are a great addition to a cow's dinner, but can be to yours as well! Rutabagas are especially good in soups and stews, and taste like something similar to a turnip, but milder.

Cabbage & Its Relatives:
The cabbage family is a large one. There is the cabbage proper, then cauliflower, broccoli or a more hardy cauliflower, kale, Brussels sprouts and kohlrabi, a cabbage-turnip combination. 

Cauliflower is a kind of refined, high-toned cabbage relative. It needs a little richer soil than cabbage and cannot stand the frost. A frequent watering with manure water gives it the extra richness and water it really needs. The outer leaves must be bent over, as in the case of the young cabbage, in order to get a white head. The dwarf varieties are often the best to plant, as they grow and develop quickly, and hopefully before the cabbage worms get wind of them!

Kale is not quite so particular a cousin. It can stand frost, and actually cool weather makes it sweeter and more tender. Rich soil is necessary, and early spring planting, because it does take some time to mature. In many climates, it may also be planted in September for a tasty spring harvest.

Brussels sprouts on stalksImage via WikipediaBrussels sprouts are a very popular member of this family. Because they are small and easy to eat, many people who do not like to serve poor, common old cabbage will serve these. Brussels sprouts are interesting in their growth. The plant stalk runs skyward. At the top, umbrella like, is a close head of leaves, but this is not what we eat. Shaded by the umbrella and packed all along the stalk are delicious little cabbages or sprouts. They are very interesting to look at, and the kids may like to help grow these! Like the rest of the family, rich soil is needed and plenty of water during the growing period. In most areas, the seed should be planted in May, and the little plants transplanted into rich soil in late July. The rows should be eighteen inches apart, and the plants one foot apart in the rows.

Kohlrabi is a go-between in the families of cabbage and turnip. It is sometimes called the turnip-root cabbage. Just above the ground, the stem of this plant swells into a turnip-like vegetable. In the true turnip the swelling is Brassica oleracea var. gongylodes, Brassicacea...Image via Wikipediaunderground, but like the cabbage, kohlrabi forms its edible part above ground. It is easy to grow. You will want to eat them fairly young, as once they get too big they can get woody and lose their tenderness. Sow out as early as possible; or sow inside in March and transplant out to the garden after danger of frost is past. Plant in drills about two feet apart. Set the plants about one foot apart, or thin out to this distance. To plant one hundred feet of drill buy about half an ounce of seed - it goes a long way. Kohlrabi is served and prepared like turnip, and is a very satisfactory early crop.

Before leaving the cabbage family I should like to say that the cabbage called Savoy (sometimes also called Chinese Cabbage) is an excellent variety to try. It should always have an early planting under cover, say in February, and then be transplanted into open beds in March or April. If the land is poor where you are to grow cabbage, then by all means choose Savoy, as it does better than many of the others in less rich soil. It is also very versatile, tender, and quick cooking, so it is great for stir fry and other Asian dishes. It has a milder flavor than regular cabbage, and softer, thinner leaves.

That's it for today.  Check back in a couple of days for our wrap-up, with some more tasty veggies and cultivation tips for your spring vegetable garden!
Enhanced by Zemanta

Vegetable Gardening Resources: