Tuesday, October 30, 2012

Backyard Landscaping Ideas

This time of year, when your garden has died down and you're thinking about planning next year's garden, is a great time to do a bit of landscaping, and map out a plan for what you would like your yard or garden to look like next time around. There are many different backyard landscaping ideas and most of them are pretty good but to find the one that is right for you and that is just what your yard needs may take a bit of planning and research.

English: Close up of hoarfrost and snow on sev...
Close up of hoarfrost and snow on several evergreen trees (Photo credit: Wikipedia)
One good backyard landscaping idea is to use evergreens. The use of these fabulous trees will do much for most any yard. They will add a stately nature to the feel of your home while keeping it welcoming and warm. Many people like to use deciduous trees in the yard and this is great for some areas, but it is the evergreens that will give the yard the structure and the stability that it needs.

Deciduous trees will not be gorgeous in all seasons, most perhaps, but not all. Evergreens on the other hand are always fantastic and they look as beautiful in the winter as they do in the summer and this is why they make for such a great backyard landscaping idea. The key to any great landscaping design is to find ideas like this that will keep your yard interesting no matter what time of the year it is.

Another good backyard landscaping idea is to use hardscape. This is the use of things like rocks, fences and walls. These can make your yard look very interesting during all seasons. You can train climbing plants on these in the summer and spring, and plant pretty trees and shrubs around them that will look great in the winter.
Backyard landscaping underway!
Backyard landscaping underway! (Photo credit: ranjan.banerji)
When looking for a good backyard landscaping idea, look for other options besides just plants. There is more to landscaping than just plants and trees.

Walls and fences can frame your property beautifully and using them is a great way to accent your yard and home because they will just accent all of your other landscaping ideas. They will frame your yard as a picture frame frames a gorgeous painting. Try some of these tips to get your yard looking tip-top this winter, in preparation for next spring's growing season!
Enhanced by Zemanta

Thursday, October 25, 2012

How Can You Tell When Your Compost Is Ready?

Patience is needed when you compost.  It can take anywhere from a few months to one year or more for your first batch of humus to be ready to use.  It will depend on the size of your bin, if you are using cold or hot composting, what you are putting into the compost and the weather and climate.  Another factor to consider is what you will be using the finished product for. Different uses can utilize the compost at different stages of the process.

English: A picture of compost soil
Finished compost. (Photo credit: Wikipedia)
The longer a compost is allowed to decompose the finer, darker, and richer it becomes. But you do not have to wait until it reaches this state to use it.  If you want to use the compost as mulch for your flower beds or other areas of your garden you can use it when it is still in a chunkier state.  The mulch is used to keep an even temperature for the soil and discourage weed growth.

If you are going to be using the mature compost to add to your planting pots, the compost should be at the last stages of the process.  Things to look for to know that your compost is ready are:
  • The amount of material that is in your bin is reduced to approximately half of the original contents.
  • When you look at the finished material, you can not tell what it used to be – no parts are recognizable.
  • The pile will no longer be as hot (if using the hot composting method)
  • The compost is dark in color and looks very much like a rich top soil
In order to have a steady supply of mature compost it is recommended to have a two-bin system going.  Once your first container is full, you can continue to compost with the second bin until you can use the material from the first. 

Enhanced by Zemanta

Tuesday, October 23, 2012

Composting Tips For Organic Gardening

I just put my summer compost to bed for the winter, but that doesn't mean I'm done composting! For the past couple of years, I've been composting year-round. I just couldn't stand throwing away so many great compost materials during the winter, so I improvised a system of storing vegetable kitchen waste in buckets during the winter - it doesn't decompose very quickly, but at least I'm not throwing it away. When spring comes, I clean last year's compost out of the composter and use it in the garden or bag it for future use, and then I dump the buckets into the composter with plenty of leaves, straw, sawdust, etc., a scoop or two of dirt and a bit of last year's compost (or unfinished compost from the top layer) to get it started. The buckets are always pretty gross, but it gives my compost a head start in the spring, and at least I'm not wasting stuff throughout the winter.

When you think about it, composting is just one more way of recycling. And when you create compost for your organic garden, not only will the plants benefit from this recycling, but so will you and your family, as you eat the fruits and vegetables that the garden produces.

Yard waste composting bin
Yard waste composting bin (Photo credit: Wikipedia)
What you are doing when you compost is decomposing previously existing organic matter, so it can be used to provide nutrients in the soil for new plants. The process does require some careful work, so you would be wise to do some reading and consulting on the subject first, to make sure you do it correctly. Also check out the archives on this blog, as we have a lot of good info on composting here.

You'll want to put all your materials into a container or at least into some environment that you can control. Some websites suggest buying an actual composting drum (like I have), that you can turn (since the material does need to be turned from time to time). Otherwise, a large garbage can might do, or just a pile on the ground, with some sort of enclosure around it to hold it in and help keep the critters out.

You can put in all the fruit and vegetable food scraps you would normally be throwing away. Add leaves, grass, and straw, and you'll have a good mixture. The general rule, according to the Garden Organic website, is about equal volumes of "green" and "brown" ingredients.

"Green" items would be things like weeds, grass cuttings, the raw vegetable leftovers from your kitchen, tea bags and coffee grounds, soft green prunings from plants, and animal manure from herbivores. All of these things are nitrogen rich, and also rot more quickly.

"Browns" would be cardboard items like cereal boxes or egg cartons, shredded waste paper, hedge clippings, old bedding plants, sawdust, and wood shavings. These items are rich in carbon, and slower to rot.

Items to avoid completely, say the people at Garden Organic, would include meat, fish, cooked food, feces from your pets, and disposable diapers. (Note: Compostable diapers such as g-Diapers can be composted if they only contain urine.)

There are also some plant materials that should not be put into your compost bin, such as those that have been infested with insects and molds. Some of these might be fine to include, but unless you're going to do a lot of careful research to discover which is good and which isn't, it's best just to leave them out. You also should avoid including weeds that are going to seed, as you don't want to spread a bunch of weed seeds in your garden next year! However, weeds that haven't yet gone to seed are great to include - you're putting the nutrients they "stole" from your soil back in.

English: Garden Compost bin, in Toulouse, Fran...
Garden Compost bin, in Toulouse, France.(Photo credit: Wikipedia)
You can create the compost in your container by mixing the greens and browns together in equal volumes, with some twigs and scrunched up cardboard here and there to create air spaces and to allow drainage. As time passes, the materials on the bottom will heat up and you'll know that the composting process is well underway. You'll need to turn the mixture occasionally, so that the top and bottom layers change places and non-composted material also has the chance to decompose. The turning provides oxygen, which is the catalyst for the decomposition. The more often you turn the bin, or at least turn the material inside it, the more quickly it will compost - as long as the proper moisture balance is maintained.

The composting itself, once the mixture is in the container, could take up to a year if the container is full and you just leave it (apart from turning). It's likely to take at least six months even using smaller amounts and turning often. But you could take at least a partial shortcut before turning material that's been in the bin for a while, by checking if the layers at the bottom have composted enough to be used. You might then lift off the top, less-composted material and pull finished compost from the bottom to mix into your garden soil, and then simply replace the other material back in the bin, with new layers going on top.

If you create your own compost, you'll go a long way toward producing a very healthy organic garden with lush, well-fed plants. And on top of that, you'll be doing your bit toward responsible recycling!


Composting Bins:


Enhanced by Zemanta

Thursday, October 18, 2012

Video - Tips for Building Square Foot Garden Boxes

This video offers some helpful tips and ideas for building your boxes for your square foot garden - from materials, to sizing and placement, to trellising, to covering your square foot gardens to make mini-greenhouses or offer protection to plants. Lots of great info here!

Square Foot Gardening 101: The Boxes!
Learn all about the box aspect of Square Foot Gardening! Well, today Belinda will go over just that. Tips for building, buying, and how to use your box to extend and protect your garden easily! Belinda Jensen (the Square Foot Gardening Expert) from ...


Square Foot Gardening Resources:
     
Enhanced by Zemanta

Tuesday, October 16, 2012

Square Foot Organic Gardening

Would you like to create an organic garden, but have such a small yard that you really don't think it's possible to have any sort of garden at all? Cheer up – you may just be able to create a square foot garden, and find yourself with a great vegetable harvest all through the growing season (and maybe even beyond).

If you've never heard of a "square foot garden", it may be because the original concept, and the PBS television series with Mel Bartholomew, started in the early 1980s. And while the idea is widely known in certain circles, this sort of garden is probably not the first thing mentioned in other gardening programs or advice columns. But it's a very feasible way to use limited space and produce great results.

English: miiu square foot garden
Square foot garden bed. (Photo credit: Wikipedia)
The idea is to create a new, raised bed on top of an existing space, with soil at least 12 inches deep, divided into squares of one foot each. The raised bed can be created inside a large cardboard box with the bottom taken out, or at least inside some kind of low enclosure, just so long as it enables you to have that 12-inch depth of soil. So if you have a space measuring four feet by four feet, for example, you'd divide it into 16 one-foot squares, separating each square with some sort of slat or raised length of twine so you can distinguish them as the plants grow and get bushy. And a different sort of plant would go into each square.

Using this method means that all the plants are quite reachable, so weeding, pruning, and even composting are easy to accomplish. You always construct the raised bed so that you are never leaning farther than a second row of plants, when watering or doing anything else. (So a four-foot square would need to be accessible from all sides.) The plant bed never becomes compacted from your walking on it, and therefore you don't need a lot of heavy tools that would normally be used for breaking up packed soil. Watering is easier, since it can be applied more carefully with a watering can, and not just sprayed indiscriminately with a hose. In addition, in the smaller space, water is retained better. And the plants will tend to help each other by "shading out" weeds before they can really take root. Any weeds that do take hold can be much more easily removed.

Diseases won't spread very easily, because the plant in the next bed over is likely to be resistant to something that might attack any particular plant. And often you can put "companion" plants side by side, so that one can protect the other from certain insects. (You may need to research which plants are good "companions" for which others.)

An updated book published by Mel Bartholomew i...
 (Photo credit: Wikipedia)
But how will you know which plants work best in just one square foot? It's not that hard to figure out. For a large vegetable, such as cauliflower, you would plant just one, in the very center. You would put one tomato plant in the square, and set up some kind of trellis so it could grow upward (large tomato plants may require more than one square - see the Square Foot Gardening book for space requirements and spacing for different plant types). The same principle would operate for other trailing plants like beans or cucumber.

On the Square Foot Gardening Foundation website, originated by Mel Bartholomew, the recommendation is that you take your cue from the seed packet itself: "If the seed packet recommends plant spacing be 12 inches apart, plant one plant per square foot. If 6 inch spacing; 4 per square foot. If 4 inch spacing; 9 per square foot. If 3 inch spacing; 16 per square foot." Plant only two or three seeds in each spot, and save the rest of the seeds in your refrigerator.

In many ways, this sort of garden can produce even more than would a regular small garden planted right in the ground. If one sort of plant is harvested early, you can then remove that plant, toss on some compost, and put another vegetable in the same spot.

If you've got quite a small space, but still want an organic garden, the square foot garden just might be your solution. It's relatively easy, requires less maintenance than a regular garden, and produces great mini-crops for you to enjoy. Check out the resources below if you would like more information on this unique type of gardening.

Learn More About Square Foot Gardening:
   
Enhanced by Zemanta

Thursday, October 11, 2012

Video - Preparing Your Garden for Winter - The Sustainable Way

Typically when you think of getting your garden ready for winter, you might think of removing all dead plants and vegetation, cutting things back, and composting them. But this video describes a slightly different process used by organic and sustainable gardeners, which works with the cycle of nature to allow your garden to do what it naturally does over the winter - and actually turns out to be less work for you! She describes some things you should do for your garden in the fall, and other things you really don't need to.

Save yourself some work this fall, and let your garden do it for you!

*How To Prepare Garden For Winter The Eco Friendly Way*
There are simple things you can do this fall and winter to take care of your garden and yard in a responsible and eco-friendly way. These easy tips for going green, will allow you to follow organic and...

Enhanced by Zemanta

Tuesday, October 9, 2012

Some Things You Don't Need to Do in a Fall Garden

If you've been reading this blog for a while, and gardening for some time, you may think you've learned everything there is to know about all the things you can do in your garden in the fall, to prepare both the soil and any remaining plants for the winter. You can seed, you can mulch, you can even plant some things now instead of waiting until the spring. You've got a whole big list. However, suddenly you realize that you've had a very long summer of constant gardening work and maybe, like the garden itself, you'd really, really like a break. So what are the things you can skimp on, without putting the garden in jeopardy?

English: Vegetable plot in winter The ground h...
Vegetable plot in winter. (Photo credit: Wikipedia)
First of all, you don't actually have to remove all the dead plants if you don't want to. If you have any diseased plants, of course you don't have a choice with those. If you leave those there, they can break down and affect the soil, and give you some very big headaches in the spring. You also don't want to put any diseased plant material into the compost bin over the winter, because it will infect the entire batch of compost and spread disease to all the plants you use it on. Take diseased material and simply throw it away or burn it.

But something like annuals that have been healthy and are now fading away can be left out in your garden over the winter. First of all, they will maintain the appearance of having some vegetation still in the garden for a while. The remnants of ornamental grasses or hostas coming up out of the snow can be very attractive. And after they've broken down over the winter, most of the time you should be able just to turn them into the soil, and they will be one element of your spring compost.

You also don't need to mulch every remaining plant in your garden over the winter. Yes, if you have some that are a little delicate, you should definitely mulch those. The purpose of the mulch is to preserve moisture so the plants don't dry out in the winter air, and to keep an even temperature in the ground around them. So some plants will still need mulching, to give them some extra protection during the winter months. But for other more hardy plants, you can skip the mulching.

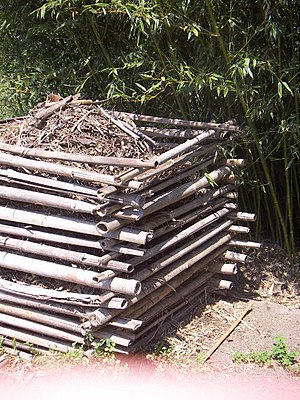
Garden Compost bin made of Bamboo canes.
Garden Compost bin made of Bamboo canes. (Photo credit: Wikipedia)
Something you should think twice about doing, although this won't necessarily save you work, is wrapping many of your plants in burlap. If you wrap your plants this way, you could actually end up trapping ice inside the burlap and against the surface of the plants. What many gardeners are now advising is that rather than wrapping in burlap to protect plants against things like cold winds, set up stakes all around each plant and wrap the burlap around the entire enclosure instead. This will serve the same purpose, but allow some breathing room for the limbs of the plants as well.

It's a lot of work preparing a garden in the spring as well as cleaning it up in the fall. It's true, of course, that whatever you leave undone in the autumn will have to be done in the spring instead, so you're not exactly saving yourself the work. However, it's also true that the spring arouses new energy, and people often feel much more ready to get a lot done. So if you're tired at the end of the growing season, and really just want to be done with it all, do just the absolutely necessary cleanup and let everything else go for the winter. Put your feet up, enjoy your well deserved rest, and start recharging your energies for a fresh start in spring.
Enhanced by Zemanta

Thursday, October 4, 2012

Video - Putting Your Garden to Bed for the Winter

Sadly, it's time for many to say goodbye to our gardens and put them to bed for the winter (unless you're practicing winter gardening, which I'll have more info for you on soon!). This quick video offers some tips for cleaning up your fall garden, and protecting perennial plants so they survive the winter well and come back strong in the spring.

How to Prepare a Garden for Winter
Lowe's shows you how to clean up your fall garden so that it looks attractive all winter. Also learn how to protect your plants so they weather the winter and come back happy and healthy in the spring. At the end of autumn or after frost, you need to...


Enhanced by Zemanta

Tuesday, October 2, 2012

Autumn Protection for Your Perennial Plants

As your garden comes to the end of its active growth and enters the fall season, you face a big cleanup to get things ready for planting when the weather warms up again. And probably even more important than that, some of your existing perennial plants will need to be protected through the winter and prepared for their new growing season in the spring. In fact, making the preparations that will protect your plants and help them survive until the following spring is absolutely paramount. You can combine this with cleaning up the rest of the garden, but if you do nothing else, at least you must get your more sensitive plants ready to survive the winter.

A cycad plant in Wuhan with its leaves tied fo...
A cycad plant with its leaves tied for some protection in winter. (Photo credit: Wikipedia)
Some of your small evergreens, for example, should be wrapped in burlap. Cedars and junipers, dwarf conifers, and other evergreens that are cold sensitive, like holly, need protection from the cold wind and potentially glaring sun of winter. The evergreens that stand upright can have their branches tied together with plastic netting, to make sure they don't break off if there's a lot of snow. The netting will provide this security but still give the plant some room to breathe. Remember also that evergreens need a very good watering just before the winter, because the dry air of winter can dehydrate them.

Roses, too, need to be guarded against the cold weather. They should have any remaining foliage stripped off, and all organic material removed from the soil around them. If they are tall bushes, their main canes should be cut back to perhaps two or three feet in height, and should be tied together in a bundle. These plants, too, can be wrapped in burlap, though in somewhat warmer climates, it might be enough just to add about eight to twelve inches of extra soil or compost around the base of the bush, depending how tall the plant is.

In very cold growing zones, climbing roses and other tender varieties are given even more protection, by being buried right in the ground. They are cut back and bundled as other roses are, with an extra length of twine loose at the top, and then a trench is dug in the soil beside the plants. It is loosened and the bush is gently tipped over until it's lying in the trench, which is then carefully filled in with the previously removed soil, leaving the loose twine exposed so the bush can be found again in the spring. After the soil is well watered, a foot-thick layer of leaves (or a bag full of leaves) is placed on the spot. This keeps the roses protected until April, when the leaves are removed and the plant is retrieved.

evergreen perennials in a shade garden under w...
Mulched evergreen perennials in a shade garden. (Photo credit: Wikipedia)
More general protection of plants that you need to overwinter in the garden can be provided by mulching. Put a layer about two inches thick around trees and shrubs, leaving perhaps an inch of clear space around the stems or trunks. Make the mulch from things like sawdust, peat moss, leaves, bark, or grass clippings. Once a month, through the winter, double check that there is moisture getting down to the soil underneath.

Of course it's important to get the garden cleaned up after a long summer of growing. However, it's even more important to make sure that the plants that will be with you again next summer are given a fighting chance for getting through the winter. Protect them properly, and when spring comes again, they'll be ready to serve as the basis for the new garden season.
Enhanced by Zemanta