I hope you are enjoying the sustainable gardening series so far. We will be covering some juicy topics soon, but today we are throwing in a special bonus that may prove extremely helpful in your gardening efforts!
Since we’ve just covered landscape design, there is one important element that can really make an impact on the success of your garden. Here it is:
Creating Raised Beds
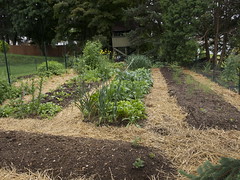 Image by VeggieGardeningTips via Flickr
If your current planting goals involve plants that require good water drainage, I am sure you know how frustrating it is to have a yard that just won’t cooperate. Some plants can handle the extra water that comes about from being in an area that doesn’t drain properly. In fact, it might just cause them to bloom more lushly. However, other plants don’t cope as well, and it could cause them to die a gruesome, bloated death. You should always find out about the drainage required for every plant you buy, and make sure that it won’t conflict with any of the areas you are considering planting it in.
To test how much water your designated patch of soil will retain, dig a hole approximately ten inches deep. Fill it with water, and come back in a day when all the water had disappeared. Fill it back up again. If the second hole full of water isn’t gone in 10 hours, your soil has a low saturation point. This means that when water soaks into it, it will stick around for a long time before dissipating. This is unacceptable for almost any plant, and you are going to have to do something to remedy it if you want your plants to survive. (This is most usually a problem in very heavy, clay-type soils.)
One great (and relatively easy) method for improving drainage in your garden is to create a raised bed. This involves creating a border for a small bed, and adding enough soil and compost to it to raise it above the rest of the yard by at least 5 inches. You’ll be amazed at how much your water drainage will be improved by this small modification. If you’re planning to build a raised bed, your prospective area may either lie on grass or on dirt. For each of these situations, you should build it slightly differently.
If you want to start a raised garden in a non grassy area, you won’t have much trouble. Just find some sort of border to contain the dirt you will be adding. I’ve found that there is nothing that works quite as well as a few two-by-fours. After you’ve created the wall, you must put in the proper amount soil and manure or compost. Depending on how long you plan to wait before planting, you will want to correct the ratio to allow for any deteriorating that may occur.
If you’re trying to install a raised bed where sod already exists, you will have a slightly more difficult time. You will need to cut the turf around the perimeter of the garden, and flip it over. This may sound simple, but you will need something with a very sharp edge to slice the edges of the sod and get under it. Once you have turned it all upside down, it is best to add a bed of straw to discourage the grass from growing back up. After the layer of straw, simply add all the soil and manure that a normal garden would need.
 Image via WikipediaPlanting your plants in your new area shouldn’t pose much difficulty. It is basically the same process as your usual planting session. Just be sure that the roots don’t extend too far into the original ground level. The whole point of creating the raised bed is to keep the roots from growing way down in the soil which stays oversaturated. Keep your garden properly watered, and you shouldn’t have too many problems.
Once you have plants in your new bed, you’ll notice an almost immediate improvement. The added soil facilitates better root development. At the same time, evaporation is prevented and rot is discouraged. All of these things added together makes for an ideal environment for almost any plant to grow in. So don’t be intimidated by the thought of adjusting the very topography of your yard. It is a simple process as I’m sure you’ve realized, and the long term results are worth every second of work.
Be sure to stay tuned for our next blog, when we’ll cover the proper soil preparation methods to make sure your new plants grow optimally and stay healthy!
Rose.
P.S. To learn more about starting your own sustainable garden, please visit http://www.newholisticliving.com/sustainablegardening.html.

No comments:
Post a Comment