Tuesday, May 31, 2011

How Does Your Garden Grow?

Mine is growing great!  It's been quite an adventure for my garden this spring.... Crazy winds, cold nights, hail, and rain, rain, rain have proved a challenge for many local gardeners. But, the garden must go on! I seem to have picked the right crop for this year - I'm focusing on mainly potatoes, and apparently they LOVE rain! Some took a couple of weeks to come up, and when it was very cool, they grew slowly, but I think they have gained 8-inches this week alone! I just finished hilling them up a bit, and did the mulching, and they look just gorgeous!

Here are a couple of  pictures of my organic garden so far this year:
Happy potato plants!


2011 Garden - late May

In this last picture, you can see the potatoes on the left. In the background are gladiolas (and other slow-growing flowers that haven't taken off yet). To the right are the remainder of my lettuces which wintered over, and cilantro. Yum!
Enhanced by Zemanta

Saturday, May 28, 2011

Video - Easy Raised Bed Garden

If you don't want to cut lumber, drill holes, and all the other typical work required for building a raised-bed garden, this quick video shows a great alternative method, which takes only a few minutes, and is super-easy. This is great for Square Foot Gardening, or just creating a raised bed garden to provide some added height and ease of maintaining.

Raised Garden Bed: Natural Cedar
Watch as we assemble an innovative raised garden bed in just a few minutes. See more at www.eartheasy.com


To learn more about this nifty and easy raised-bed garden technique, visit www.eartheasy.com.

Enhanced by Zemanta

Thursday, May 26, 2011

Is a Raised Garden Right for You?

Raised gardens are becoming quite popular as more and more people are renting property or find themselves in high rise apartment buildings with little to no lawn space and even less access to actual soil in which to plant the flowers and vegetables they desire to grow. There are actually quite a few pros for using raised gardens as opposed to tilling the soil for those who wish to have smaller gardens or have limited space. At the same time, those who desire bigger yields are often dissatisfied with the limits of Raised Bed Garden
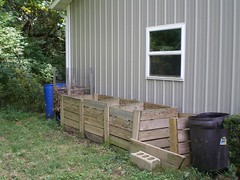
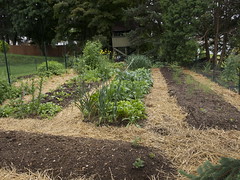
Image by VeggieGardeningTips via Flickrraised gardens. The choice is ultimately yours but I will try to point out some of the pros and cons of this type of garden so that you may decide for yourself.

Soil compaction: Plants love to breathe and that is often difficult when placed in traditional garden rows, as we have quite a bit of difficulty avoiding the possibility of stepping onto the tilled rows in which we have planted our fruits, vegetables, or plants. By using a raised garden, which is designed to be worked from without rather than within, there is little fear of compacting the soil around the plants. At the same time many lifelong gardeners feel the inability to walk around in their gardens is a disadvantage in itself and prefer to be able to do so. This is often a matter of preference rather than practicality but a valid opposition just the same.

Numbers: You can actually plant more plants in the same amount of square footage in a raised bed because there is no need for rows. You should also be aware that plants in raised beds often tend to grow larger than plants in traditional garden rows. That being said you should resist the urge to over plant within the raised garden bed, as this will eliminate that slight benefit. (For some helpful tips on this, see info on Square Foot Gardening.)

Watering and Drainage: One huge benefit to raised beds for summer gardens in areas that are nearly saturated with excess moisture is that raised beds allow much better drainage than traditional row gardening. This is one thing that the average gardener will not argue with unless he lives in an area in which this isn't much of a problem. Most gardeners in the south though, where there is a great deal of humidity and moisture will agree that proper drainage is a problem.

HochbeetImage via WikipediaMobility/Tending To Your Garden: Raised beds are less back-breaking. This is a huge benefit to those of us who are feeling the years creeping into our bones. By being above ground, raised gardens offer easier access for planting, weeding, planting, and investigating for signs of pests. Another great thing about raised gardens is that they warm more quickly, which renders them more productive and with longer growing seasons than most gardens that are placed in the ground.

Also, for those who have unusually shaped yards or growing areas, raised gardens allow the opportunity to have a beautiful summer garden in almost any shape you can build the box for. This means you are not limited to rows, as many gardens tend to be and that you have a few more options for aesthetics when planning and growing your summer garden.

The downside to raised gardens is that they are difficult to dismantle and nearly impossible to till. This means you must do all the working of the soil by hand and many gardeners do not fully appreciate the beauty of that process. The most important thing however, is that you choose a summer garden system that works for you.

You can do a traditional raised-bed garden, or try an alternative method such as straw-bale or Square Foot Gardening - either way you can reap the benefits of this unique gardening technique.

Raised Bed Gardening Resources:
    

Tuesday, May 24, 2011

6 EasyTips for Creating a Summer Garden on a Budget

Gardening can quickly escalate into an expensive undertaking if you do not enter into the prospect with certain and very specific budget constraints in mind. If you plan according to your budget and purchase according to your specific plans and needs you are likely to find that your summer garden is more budget-friendly than the vast majority of other gardens on the block. I hope the advice that follows will help you cut the expense of gardening and help you find budget-friendly ways to build the summer garden of your dreams.

Part of a parterre in an English garden. Photo...Image via Wikipedia1. Don't buy what you don't need. It may seem simplistic, but who among us hasn't gotten seduced by a great sale? It doesn't matter how good the deal is -- if you do not need the seeds, tools, and various other items there is no real reason to purchase them. It is a waste of money that could be better spent elsewhere.

2. Don't pay for shipping if it can be avoided. You may find a few items cheaper online but be very aware of the costs involved in shipping. If it costs more when all is said and done than it would have cost to purchase the same items locally you haven't saved anything at all. Look at the big picture rather than seeing only the cheaper asking price. It is also a good idea to support small local businesses whenever possible as they are going to be more likely to bargain, barter, and throw in freebies.

3. Check locally for free composting materials. Many communities offer these free to residents. When compared with the expense of purchasing these materials the savings can be significant over the course of a summer.

4. Work out an exchange among gardening friends. This is a great way to incorporate new plants into your summer garden without purchasing each plant you wish to include! This is also a great way to make new gardening friends, share a passion, and save money. It's a win-win situation for most gardeners!

5. Select plants that are native to your area for your summer garden. This is a huge money-saver that is often overlooked (and it's also more sustainable!) The costs of non-native plants can be excessive in the best of circumstances and the added care incurs further costs - especially if you end up not being able to keep the plants alive, or productive. Keep costs down by selecting plants that will easily thrive in your climate and those that are locally cultivated. This isn't an all-or-nothing proposition of course. If you absolutely love a couple of non-native plants, by all means incorporate them into your garden. However, if you are planning a garden from scratch choose as many native plants as possible for filler.

6. Check your local classified ads and free-cycle program for used garden tools that are in good condition. There are many reasons that people sell or give away garden tools and a bargain is a bargain on these tools that are going to be used to play in the dirt. You do not need to be incredibly picky about the tools you purchase and saving money is almost always a good thing. It's even better, of course, when you get them for no cost at all. You also might find a few free plants available through these sources too.

Shredded wood used as mulch. This type of mulc...Image via Wikipedia7. Mulching saves time and money. Really! It saves water to mulch because the mulch holds the moisture in. This lowers the cost of watering and eliminates many of the pesky weeds that crop up-which saves time. We all know that time is money and most of us despise weeding - unless we have some truly aggressive emotions to work through, that is. :-)

By using all of the steps above you should find that you have saved a good deal of money in the planning and growing of your summer garden. Combine them with tips of your own that you discover along the way and next summer your garden should cost even less.

Enhanced by Zemanta

Saturday, May 21, 2011

Video - How to Build Your Own Compost Bin

Here is a helpful video on building your own compost bin - practically for free! If you don't have any tools, you may have to pick up a couple things, but they are pretty basic, and other than the staples and twine, if you follow some of his tips for finding materials for your bin, you may spend little or nothing on making this bin.  (He actually shows you a couple of different types of bins, as well as how to start the composting process.)

I particularly like the first bin he demonstrates because, as he mentions, the sides can easily be opened/removed if needed, to remove the finished compost, and it can also be taken apart and moved to a new location.

Check it out, and see how easy it can be to make your own compost bin!

how to build a compost bin
vavrek shows how to build a large compost bin using free materials :: save the scraps, save our world !


Enhanced by Zemanta

More Composting Resources:
   

Thursday, May 19, 2011

Building Your Own Compost Bin

If you would rather not purchase a bin for your compost pile, you should still devise a way to contain it.  You can easily and inexpensively build your own bin.  This will give you more control over the size of the pile and can prevent unwelcome animals helping themselves to some free food.

CompostingImage by JenWaller via FlickrIf you are using recycled lumber and it has been treated (either painted or stained) make sure it has been done using non-toxic material.  You do not want anything toxic or poisonous to come in contact with your compost, especially if you are going to be using it where you are growing food.

You will need four 4-foot sections of 2X4 and 20 3-foot sections of 1X6 boards.  Begin by hammering the 2X4 lumber pieces into the ground with a sledgehammer at the corners of what will become a 3 feet squared container (space each corner post 3 feet apart). 

Next, put five boards to every side securing each end of the board to the corner post with nails.  Be sure to leave enough room in between each board for air circulation.  You can use a piece of plywood or another flat piece of material large enough to cover the top as a cover if you wish.

A tidy stack of pallets somewhere on Universit...Image via WikipediaAnother way to build your own bin is to use new or recycled pallets.  Find wooden pallets (you may be able to find them at a land fill site) and nail or screw them together to form a square.  If you want you can add a fifth to give the bin a bottom, but this is not necessary.

Another option is to enclose the pile with a wire mesh.  You can either create a circle with the mesh and secure with metal ties or hammer wooden posts in a circle around the pile and secure the mesh to the wooden posts.

Hopefully this gives you some good ideas for building your own compost bin. If you're still feeling confused, or you just want to see an example, come back on Saturday for a helpful how-to video!

Enhanced by Zemanta

Tuesday, May 17, 2011

How to Choose a Composting Container

Well, summer is coming, and with it (in most areas) prime composting season! If you're not familiar with composting, browse our previous posts for some great instructions and tips, and stay tuned, as we post article on composting here fairly frequently.

Turning a compost pile for viticultureImage via WikipediaOne of the first things to consider when building your compost is how you will contain it. There are many sizes, shapes, and styles of composting bins to choose from.  You can buy one fairly affordably, make one yourself, or opt for not using one at all and create a compost pile or heap.

A compost tumbler is a cylindrical shape much like a drum laid on its side.  It can be turned on a base that is supported on the flat ends.  By turning the drum you are rotating and aerating the materials at the same time.  It is an easy and effective way to rotate your compost. (This is the one I use - I've had it for 3 years, and am overall very happy with it: Envirocycle Compost Tumbler. It is easy to fill, easy to turn, and it has a collector at the bottom for "compost tea" - you WON'T want to drink it, but your plants will!)

A bio-orb container is shaped like a round ball and comes in various sizes.  The benefits of this type of container are the ease of getting it around (you can roll it over to your yard waste and roll it back to its base), and the act of rolling it also aerates and rotates the contents.  There are many small round holes in the container to let air in too.

Home Composting, Roubaix, FranceImage via WikipediaA wooden box composter with slats or a wooden framed box with mesh sides can be purchased or easily made at home.  If you can find four wooden pallets, you can nail them together to create a compost bin very inexpensively or you can find a roll of wire mesh at your local hardware store.  Both of these options allow air to circulate as long as the contents are not too compacted. (We will post some more detailed instructions and possibly a video on this later this week, so be sure to check back for that.)

If you do not want to use a bin, start with a pile of glass clippings or leaves and start to layer your food scraps on top.  As time goes by and your pile continues to grow make sure you rotate and “stir” it frequently.  Be warned though, it is not as easy to turn a pile that is not contained.  They tend to grow in circumference over time as the pile spreads out after rotating.

Check back on Thursday for some tips on building your own composting container!


Some Examples of Good Composters:
 
Enhanced by Zemanta